Category Archives: Development

The importance of fine-grained GPU preemption support for VR – Imagination Technologies

preemption
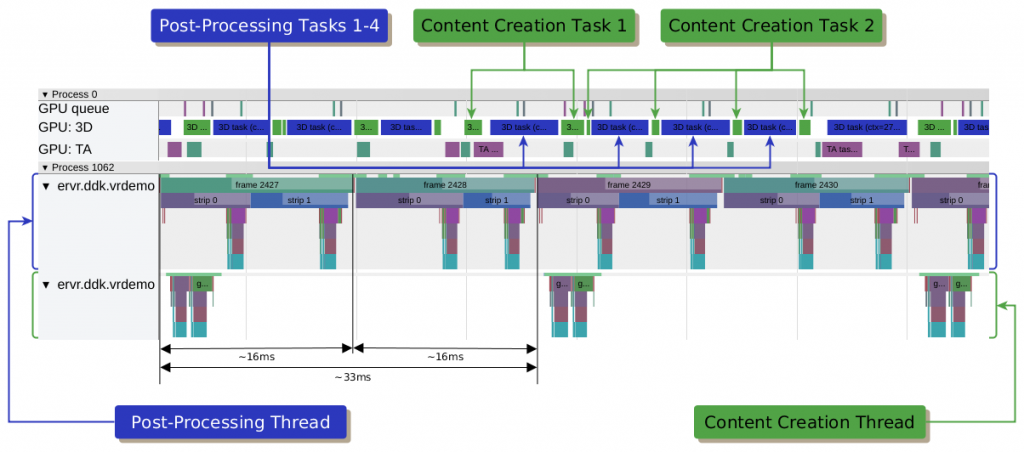
We show why fine-grained GPU preemption support in VR is important for advanced techniques like front buffer strip rendering or asynchronous time warping.

Source: The importance of fine-grained GPU preemption support for VR – Imagination Technologies

Reducing latency in mobile VR by using single buffered strip rendering – Imagination Blog

Reducing latency in mobile VR requires the support of many components in a smartphone, from the head motion sensor to the CPU and GPU and the display …

Source: Reducing latency in mobile VR by using single buffered strip rendering – Imagination Blog

SmartMirror project part 2: Software

In the first part of this series I looked into how to assemble a two-way mirror so that an Android phone behind it can be used as an information hub. Of course this is only one part of the story, cause we also need some software to display all this useful information on our Android device. Now, obviously there is already such software available, however I decided to write my own version from scratch for the following reasons:

  • to learn more about Android application development
  • it had to support Android Gingerbread (API level 10)
  • have all the modules important to me here in the UK
  • I like coding …

I will not fully describe all the code in this post, you can find the complete git repository here, but instead only pick the parts I think need some more detailed explanation. So lets start …

All about modules

I chose the common software pattern of  separating the final presentation of the data from the task of gathering it. All the data generation is done in modules which are independent of the UI. Most of those modules are using a remote web service for the information retrieval and therefore need to run asynchronous to the application main thread. By using OkHttp asynchronously for the remote access this is basically provided for free. A module is based on the abstract class Module which acts as connection to the UI. Every module will call postData when new data is available and postNoData when there is no data available or the module wants to clear any previous data it had sent. Obviously there are also some simple modules like the ClockModule which don’t use any web service, but also don’t need the complex asynchronies behaviour cause they executing rather quickly. Each module defines it own update rate cause this really depends on the nature of the data itself. Train time updates are rather frequent in contrast to the sunrise/sunset times which only change twice a day. Speaking about those two modules, let’s have a look which modules are available at the time of this writing:

  1. Time/Date: ClockModule
  2. Sunrise/Sunset: SunTimesModule
  3. Weather information from the UK Met Office: ForecastMetOfficeModule
  4. Travel time to work by car: TimeToWorkModule
  5. Next tube trains from a specific station: TflModule
  6. Next national rail trains from a specific station: NationalRailModule
  7. Upcoming calendar events for the next few days (API level >= 23): CalendarModule

Actually there is an eighth module called the TrainJourneyModule. This is a meta module combining the output of the tube and national rail train times modules into one. It sorts them by departure time so both types are shown interleaved.

For the data query part, Met Office, Tfl and Google Maps are using JSON. This is pretty standard nowadays and Java on Android has built-in support for parsing it. I was looking into more advanced JSON parsing libraries like gson and jackson but decided for the really simple task of parsing one static response it is not worth it to pull in those big dependencies. Maybe I will change that it the future, but for now the present code works just fine.

Looking at JSON data in Firefox is much more comfortable by using a JSON document viewer add-on like JSONView.

A completely different beast is the data query task for the National Rail module. National Rail uses the SOAP protocol and compared to JSON the authentication is already complicated. All web services use some type of API access token which is unique to every developer. This exists to prevent misuse of the public API, but in some cases also to limit the number of times an API can be accessed per day. To successfully prove to the National Rail web service that we are who we are we need to add an authentication token to the SOAP envelope header:

Namespace soap = Namespace.getNamespace("soap", "http://schemas.xmlsoap.org/soap/envelope/");
Namespace ldb = Namespace.getNamespace("ldb", "http://thalesgroup.com/RTTI/2014-02-20/ldb/");
Namespace typ = Namespace.getNamespace("typ", "http://thalesgroup.com/RTTI/2010-11-01/ldb/commontypes");
Element env = new Element("Envelope", soap);
/* Header */
env.addContent(new Element("Header", soap).
        addContent(new Element("AccessToken", typ).
            addContent(new Element("TokenValue", typ).
                addContent(BuildConfig.NATIONALRAIL_API_KEY))));

BuildConfig.NATIONALRAIL_API_KEY contains the API key. The rest of the body contains the actual request:

Element dep_request = new Element("GetDepartureBoardRequest", ldb).
    addContent(new Element("crs", ldb).
            addContent(BuildConfig.NATIONALRAIL_CRS)).
    addContent(new Element("numRows", ldb).
            addContent("5"));
...

Now, you may think this is simple enough, but I can assure you I needed quite some time to figure this out, cause the server on the other side is pretty strict on how this structure should look like. And as you can see SOAP uses XML which makes the request creation and the response parsing even harder. Luckily jdom2 exists which greatly simplifies this task. Here you can see the complete xml request:

<?xml version="1.0" encoding="UTF-8"?>
<soap:Envelope xmlns:soap="http://schemas.xmlsoap.org/soap/envelope/">
  <soap:Header>
   <typ:AccessToken xmlns:typ="http://thalesgroup.com/RTTI/2010-11-01/ldb/commontypes">
     <typ:TokenValue>6ef19def-6037-44f4-a2ac-06449273214f</typ:TokenValue>
   </typ:AccessToken>
  </soap:Header>
  <soap:Body>
    <ldb:GetDepartureBoardRequest xmlns:ldb="http://thalesgroup.com/RTTI/2014-02-20/ldb/">
      <ldb:crs>CHX</ldb:crs>
      <ldb:numRows>5</ldb:numRows>
    </ldb:GetDepartureBoardRequest>
  </soap:Body>
</soap:Envelope>

For more information on the various formats used by the different providers, have a look to their developer portals:

User interface

The user interface is quite simplistic. There is no way to interact with the application because it is behind a mirror. The only function the application has is to display the output of our modules in a nice and readable way. All the text and icons are white on black background. This ensures for best contrast behind the two-way mirror and makes it possible to see the information even on normal daylight. I tried to make all state changes animated, see for example AnimationSwitcher for the details. One interesting challenge is the code for switching to fullscreen for the different supported API levels. A nice feature of Android is that you can use new functionality of newer Android versions in your application and check at runtime if this new functionality is available. In your build.gradle you define the minimum supported Android version (minSdkVersion) and also the version your application is written against (targetSdkVersion). At runtime you check Build.VERSION.SDK_INT against the Android version when a specific feature was introduced. Only if this is equal or greater you can use this code. Now if you are below the required Android version you either need to fallback to other code providing similar functionality or your application can’t provide support for this particular feature (see e.g. CalendarView).  Main.java contains four different functions for switching into fullscreen. In API level 13 and below the only way to do this was to set the FLAG_FULLSCREEN for the main window. Starting with API level 14setSystemUiVisibility was introduced which allows a more fine grade configuration of the behaviour of the Android system when your application is in the foreground. Over the following Android versions more and more flags have been introduced.

Configuration

MirrorHub doesn’t come with any runtime configuration. Remember the user is not able to make any changes when the phone/tablet is attached to the mirror. All the configuration is done at compile time by setting the various options in the gradle.properties file. You can use gradle.properties.example as the start for your own experiments. It contains things like the location for the weather forecast or the tube/train station you like to have departure information displayed on your mirror. But most importantly it contains the API keys for the various web services in use as outlined here.

I also added a runDebug/runRelease task to gradle which allows you to start the application without any physical interaction with the device. Together with an app like WiFi ADB you can install and run the application remotely while the device is attached to the mirror. However, please note that WiFi ADB needs a rooted device.

Final thoughts

I think the app has a lot of nice feature already. It runs on my mirror 24/7 and works just fine. I still have some more ideas for modules, like a caldav module to display calendar events from a caldav server, because the Android version that I use has no direct calendar support. I also played around with the proximity sensor to detect some hand waving in front of the mirror. It works fine with just the device, but unfortunately not when the phone is behind the mirror. The code is still there, so if you have some ideas how to make something like this work let me know in the comments.

Finally here are some screenshots while MirrorHub is running:

For some images together with the mirror see the end of the first post.

Test, 1, 2, 3, test, test

Everybody know these words. You say it when you have to check a microphone which were plugged into some sound system. It’s just test if the microphone is working well and the spoken words are reflected by the amplifier. It’s a simple test to check the functionality of the microphone or the whole sound system. Why should I write about sound systems? No, I don’t try to learn playing a guitar or any other instrument, I like to share some thoughts about software testing. After writing a post about Valgrind, I had the feeling that I should try to show some ways of testing software. In the following post I will analyze what can be tested, what is useful and which tools are available. I don’t aim to make a full overview of software testing itself, I just like to highlight some tools (or thoughts) which are useful and every developer should know of.

Why should I test my software

This is easy to answer. Humans write software and humans tend to make mistakes. Even if something is working perfect, a bug fix or new feature can break it. Testing software will not prevent you from bugs, but it can boost your user satisfaction a lot, by removing errors which are common and avoidable.

What can be tested

First of all, you should think about what should be tested at all. The following list tries to categorizes different tests from a technical perspective:

  1. Static tests
  2. Compile time tests
  3. Runtime test

Also we have to differ between automatic tests and manual tests done by an operator. In the following I will prioritize the automatic tests, simply because once they are setup, they are easier to handle. Manuel tests means, setting up a test plan, making someone responsible for checking the test plan and forcing the test to be done before a release. On the other side automatic tests could be done by a machine at day and night with every software level your application is currently in.

Static tests

Static tests analyze the code base and try to predict error paths. There are several applications on the market, but most of them are not free. First you need a product which speaks your language. If you develop in C, C++, Java, C# or whatever makes a huge difference here. There are many static analyzer out there which can analyze C, but not many can successfully parse any of the widely used higher programming languages. One of them, which can analyze C++, is Fortify. Fortify uses rules to find different errors a developer can do. There are of course default rules, but a developer can define rules himself. This product is specialized in detecting errors which may end in security holes. One such error in terms of security considerations is file input handling. When one is reading a string directly out of a file, some assumptions are done. Strings in the C/C++ world are zero terminated. All string handling/manipulation function, which are available e.g. from the glibc, are working over the single characters as long as they didn’t find the termination byte. Now, if a developer is reading a string out of a file and doesn’t check if the terminating zero is there, he open a security hole. If an attacker is using this knowledge he is able to provoke a buffer overflow. Fortify can detect such blindly faith to input data. Of course it can detect much more. On the down side, as most software projects are really complex, static code analyzer tend to produce many false/positive. Working through this false/positive and defining filters for the own software project needs much time. On the other side these tools help in finding error paths, which even runtime tests doesn’t show, cause they are so unusual. But exactly these errors are used by attackers to abuse your software for bad things.

Compile time tests

Compile tests make sure your application compiles on different architectures, bit depth, or with other resources like external dependencies (e.g. depending third-party libraries). They are important when you develop for and/or if your team is using different platforms. They make sure a software is at least compiling on every important system. This doesn’t mean the current status works well, it just makes sure every developer involved in the progress of the product is able to build an actual version, even if he is working on a different part of the software itself. Such a situation happens often in open source products, like Mozilla, which invented tinderbox for making these tests. It allows you to set up different build environments for your software and watch the result of every check-in you made in terms of compatibility to this environment. The following shows a screenshot of the Firefox-Ports tinderbox with one broken build box. As everybody know, red is bad:

Red means a burning tree. It shows you that your last check-in doesn’t compile on a specific system. The cool thing is that you can look at the log and spot the error with ease. You know why it doesn’t compile and can fix it. This will prevent you from being blamed by other team members because they can’t work with the current trunk.

Runtime tests

Runtime tests are of course the biggest part of testing. They try to make sure the application does the job it was written for. This also means these tests are the hardest one. It may help to try to separate them as well. I use the following separation:

  1. Unit tests
  2. Dynamic analyzer
  3. GUI tests

Unit tests

Unit tests check that the specialized functionality a unit provide is working correctly. A well-known example is string handling. String handling is necessary in almost all software projects out there. May it printing the help section of a command line tool or the information presentation in an GUI application. A unit test tries to test anything a user of this unit may do with it. This could be adding a string to another, replacing parts of a string, converting a string to other formats (like to another encoding or to an integer) or much more complex operations like searching within a string with a regular expression. All these operations could be relatively easy tested with unit tests. There is no general usable software out there which could be used for unit testing, but most software frameworks offer some help to write unit tests. Qt has a unit test framework and VirtualBox has a integrated system, as well. Here is a screenshot from a just announced graphical tool by Nokia, which makes spotting errors in Qt unit tests much more easier. The second screenshot shows the output of a VirtualBox unit test.

Please also note that unit testing not just means testing functionality. It could also mean testing performance regression. If some function needed an amount of time in an existing version, it should be at least equal or faster in means of execution time in a new version. Unit tests are evolutionary like the software itself. It is illusionary to believe a unit test is finished sometime. The test will/should grow as long as users will report errors. Often a unit test is called by the bugtracker id, which showed some specific problem the first time.

Dynamic analyzer

This field of testing is a little bit different from the other one, cause the developer needs to interact here. Although it would be possible to automate some of these tests, they are more designed to be done by the developer from time to time (usually after a feature is completed) to check for some basic errors. The most common dynamic analyzer in the open source world is the Valgrind instrumentation framework. It has a tool for checking memory management errors, like I showed in this post. As already written there, memory leak errors can happen to everyone, so having a tool for finding and eliminating them, is very useful. On the other side there is a tool called Callgrind, which profiles a given software in detail. After profiling some software, a developer is able to see execution times relatively to each other. This makes it possible to find the places an algorithm spend the most time. With this information a developer has the chance to find bottlenecks, which maybe could be eliminated. Beside that, is the knowledge of the call graph sometimes from great information, especially if you develop graphical applications, like in Qt. Having events, slots or asynchrony window systems, like in X11, make it sometimes hard to predict how the code will flow. It may also be helpful in deciding if some subroutine is a candidate for parallel execution. The following screenshot shows the result of analyzing some parts of VirtualBox. To visualize the output of Callgrind (and to interactively work with this data), KCachegrind is the number one tool. The second screenshot shows some similar profiling with Instruments from Xcode.

GUI tests

GUI’s have the advantage to do several tasks in an independent order and users tend to do tasks in a way a developer don’t expect. Developer tends to do tasks in the way they have programmed it. On the other side GUI testing tools do only things they are programmed for. To be honest, we don’t do any automatic GUI testing in VirtualBox. It’s such a wide field and doing it right is hard. Anyway, there are products out there which can be helpful. Qt itself have possibilities for GUI testing build in. Another product is from froglogic. Squish is specialized in GUI testing, especially for Qt applications. But of course there are other tools as well. Just have a look at your preferred build environment.

Conclusion

Testing produces work. It is also something developers don’t like. On the other side it helps to prevent further work by bypassing errors which are preventable. Everybody should ask himself how much time he will sacrifice in setting up test machines or unit tests to make a product much more stable. Errors in freshly released products which don’t happen in an older release are always bad marketing. If there is a chance to prevent them by just adding some lines of code, everyone should use this chance. This post doesn’t show all available tools for testing. For example, the big players like Apple and Microsoft have also testing and analyzing software build into there IDE’s. I just want to give a brief overview what is possible, so that everybody could check the own environment for possibilities of doing testing.

As a last word which touches my personal work environment: Please be assured that we are trying hard to make VirtualBox as stable and save as much as possible ;).

Kernel driver code signing with the VeriSign Class 3 Primary CA – G5 certificate

Since the first 64-bit version of Windows Vista it is necessary to digital sign any kernel mode driver. Without a proper code signing the driver isn’t loaded by the system. Although it is also possible to sign drivers and applications for the 32-bit versions of Windows (as far as I know starting with Windows XP) it became mandatory in the 64-bit versions for any kernel mode driver. A serious software provider always sign its own software to make sure the user can rely on the authenticity of the package he e.g. downloaded from the Internet. It also prevent a question about installing a driver from an untrusted source which could be denied by the user and therefore makes the own software unusable. In any case the user has to confirm an installation of a driver, even if this driver is correctly signed, if the driver isn’t Windows Hardware Quality Labs (WHQL) certificated. In the following post I will not explain the basics of how to sign Windows drivers, there are many articles out there like the one from Microsoft itself, but I will look at changes which have to be made to correctly code sign drivers with a certificate signed by the VeriSign Class 3 Primary CA – G5 root certificate, which is in use by the end of 2010.

Chain of trust

To ensure the validity of every component in a computer system (hardware or software) a chain of trust is build. This basically means there is some root institution (in computer cryptography this is called Certificate Authority (CA)) which is trusted per se. Any following part in this hierarchy is signed by the parent authority. This allows a flexible mechanism where only the connected parties have to make sure they trust each other to make the full chain trustworthy. This concept is also used for code signing, cause it allows to be trustworthy in the eyes of Microsoft without ever being in touch with them. As Microsoft don’t trust (for code signing) every root CA they have in their certificate store, they explicit allow only a handful of root CA’s to be in this trust of chain. They archive this by cross signing root CA’s with their own CA. The full concept is described in this article. It basically means the software maker certificate has to be trusted by an official CA included in every Windows version and this root CA has to be cross signed by Microsoft for code signing. This is the point where the problems start with the new VeriSign Primary CA.

Finding the little differences

The old code signing CA is the VeriSign Class 3 Public Primary CA, available since 1996. This certificate uses an 1024 bit key, which isn’t considered save anymore in the future. Therefor VeriSign decided to replace this root CA with a stronger one, which uses an 2048 bit key. If you simply replace an old software maker certificate (signed with the old root CA) with one which is signed by the new CA you get a surprise. Installing a kernel mode driver signed with the new certificate ends up with a message like this:

A look into the security log of the event viewer shows this error message:

Code integrity determined that the image hash of a file is not valid. The
file could be corrupt due to unauthorized modification or the invalid hash
could indicate a potential disk device error.

To be honest: This information doesn’t contain any useful hint. If you compare the old signed driver with the new signed driver you will not see any difference. Both could be successful verified as shown next:

Even if you compare all the sub-dialogs side by side you will not find any difference, beside the different root CA of course. So whats the difference? Well, you can’t rely on the graphical representation of this trust of chain. When you invoke the signtool of the Windows Driver Kit (WDK) with the verify option, you will see the difference:

C:Program FilesOracleVirtualBox_Sun>signtool.exe verify /v /kp drivers/vboxdrv/VBoxDrv.sys

Verifying: drivers/vboxdrv/VBoxDrv.sys
SHA1 hash of file: 9E58611C764D5AE04140E4CC7782B3229D1BCB8A
Signing Certificate Chain:
    Issued to: Microsoft Code Verification Root
    Issued by: Microsoft Code Verification Root
    Expires:   01.11.2025 14:54:03
    SHA1 hash: 8FBE4D070EF8AB1BCCAF2A9D5CCAE7282A2C66B3

        Issued to: Class 3 Public Primary Certification Authority
        Issued by: Microsoft Code Verification Root
        Expires:   23.05.2016 18:11:29
        SHA1 hash: 58455389CF1D0CD6A08E3CE216F65ADFF7A86408

            Issued to: VeriSign Class 3 Code Signing 2004 CA
            Issued by: Class 3 Public Primary Certification Authority
            Expires:   16.07.2014 00:59:59
            SHA1 hash: 197A4AEBDB25F0170079BB8C73CB2D655E0018A4

                Issued to: Sun Microsystems, Inc.
                Issued by: VeriSign Class 3 Code Signing 2004 CA
                Expires:   12.06.2011 00:59:59
                SHA1 hash: 1D4458051589B47A06260125F6EC6BBB6C24472E

The signature is timestamped: 08.02.2011 00:23:54
Timestamp Verified by:
    Issued to: Thawte Timestamping CA
    Issued by: Thawte Timestamping CA
    Expires:   01.01.2021 00:59:59
    SHA1 hash: BE36A4562FB2EE05DBB3D32323ADF445084ED656

        Issued to: VeriSign Time Stamping Services CA
        Issued by: Thawte Timestamping CA
        Expires:   04.12.2013 00:59:59
        SHA1 hash: F46AC0C6EFBB8C6A14F55F09E2D37DF4C0DE012D

            Issued to: VeriSign Time Stamping Services Signer - G2
            Issued by: VeriSign Time Stamping Services CA
            Expires:   15.06.2012 00:59:59
            SHA1 hash: ADA8AAA643FF7DC38DD40FA4C97AD559FF4846DE

Successfully verified: drivers/vboxdrv/VBoxDrv.sys

Number of files successfully Verified: 1
Number of warnings: 0
Number of errors: 0

C:Program FilesOracleVirtualBox_Sun>

and

C:Program FilesOracleVirtualBox_Oracle_Wrong>signtool.exe verify /v /kp drivers/vboxdrv/VBoxDrv.sys

Verifying: drivers/vboxdrv/VBoxDrv.sys
SHA1 hash of file: F398B7124B0A8C32DBFB262343AC1180807505D0
Signing Certificate Chain:
    Issued to: VeriSign Class 3 Public Primary Certification Authority - G5
    Issued by: VeriSign Class 3 Public Primary Certification Authority - G5
    Expires:   17.07.2036 00:59:59
    SHA1 hash: 4EB6D578499B1CCF5F581EAD56BE3D9B6744A5E5

        Issued to: VeriSign Class 3 Code Signing 2010 CA
        Issued by: VeriSign Class 3 Public Primary Certification Authority - G5
        Expires:   08.02.2020 00:59:59
        SHA1 hash: 495847A93187CFB8C71F840CB7B41497AD95C64F

            Issued to: Oracle Corporation
            Issued by: VeriSign Class 3 Code Signing 2010 CA
            Expires:   08.02.2014 00:59:59
            SHA1 hash: A88FD9BDAA06BC0F3C491BA51E231BE35F8D1AD5

The signature is timestamped: 10.02.2011 09:30:08
Timestamp Verified by:
    Issued to: Thawte Timestamping CA
    Issued by: Thawte Timestamping CA
    Expires:   01.01.2021 00:59:59
    SHA1 hash: BE36A4562FB2EE05DBB3D32323ADF445084ED656

        Issued to: VeriSign Time Stamping Services CA
        Issued by: Thawte Timestamping CA
        Expires:   04.12.2013 00:59:59
        SHA1 hash: F46AC0C6EFBB8C6A14F55F09E2D37DF4C0DE012D

            Issued to: VeriSign Time Stamping Services Signer - G2
            Issued by: VeriSign Time Stamping Services CA
            Expires:   15.06.2012 00:59:59
            SHA1 hash: ADA8AAA643FF7DC38DD40FA4C97AD559FF4846DE

Successfully verified: drivers/vboxdrv/VBoxDrv.sys

Number of files successfully Verified: 1
Number of warnings: 0
Number of errors: 0

C:Program FilesOracleVirtualBox_Oracle_Wrong>

As you can see, the chain of trust of the old certificate contains the Microsoft Code Verification Root, the new signed driver not. As Microsoft released the cross certificate somewhere in 2006, it makes sense that the new VeriSign certificate isn’t signed by them. So first of all, we have to blame the signtool for silently ignoring a cross certificate which, obviously, doesn’t trust the root certificate. When you have this information you can search for additional information and probably find an advisory of VeriSign. There you learn you need intermediate certificates for the new root CA.

Installing the right certificates on the build machine

The rest is easy. The certificate store of any Windows installation contains the new VeriSign Root CA as shown here:

Delete this root CA and replace it by the intermediate certificates you fetched from the website shown above. Just place the certificate in a text file, add the extension .der and double-click to install it. Make sure to replace really all versions of this certificate, even the one in the global store. When you now sign your driver with your new certificate the Microsoft Code Verification Root is in the trust of chain, as shown in the following:

C:Program FilesOracleVirtualBox_Oracle_Correct>signtool.exe verify /v /kp drivers/vboxdrv/VBoxDrv.sys

Verifying: drivers/vboxdrv/VBoxDrv.sys
SHA1 hash of file: 201B7F97473D7F015A104D7841371C5AE4F22FF2
Signing Certificate Chain:
    Issued to: Microsoft Code Verification Root
    Issued by: Microsoft Code Verification Root
    Expires:   01.11.2025 14:54:03
    SHA1 hash: 8FBE4D070EF8AB1BCCAF2A9D5CCAE7282A2C66B3

        Issued to: Class 3 Public Primary Certification Authority
        Issued by: Microsoft Code Verification Root
        Expires:   23.05.2016 18:11:29
        SHA1 hash: 58455389CF1D0CD6A08E3CE216F65ADFF7A86408

            Issued to: VeriSign Class 3 Public Primary Certification Authority - G5
            Issued by: Class 3 Public Primary Certification Authority
            Expires:   08.11.2021 00:59:59
            SHA1 hash: 32F30882622B87CF8856C63DB873DF0853B4DD27

                Issued to: VeriSign Class 3 Code Signing 2010 CA
                Issued by: VeriSign Class 3 Public Primary Certification Authority - G5
                Expires:   08.02.2020 00:59:59
                SHA1 hash: 495847A93187CFB8C71F840CB7B41497AD95C64F

                    Issued to: Oracle Corporation
                    Issued by: VeriSign Class 3 Code Signing 2010 CA
                    Expires:   08.02.2014 00:59:59
                    SHA1 hash: A88FD9BDAA06BC0F3C491BA51E231BE35F8D1AD5

The signature is timestamped: 10.02.2011 15:03:30
Timestamp Verified by:
    Issued to: Thawte Timestamping CA
    Issued by: Thawte Timestamping CA
    Expires:   01.01.2021 00:59:59
    SHA1 hash: BE36A4562FB2EE05DBB3D32323ADF445084ED656

        Issued to: VeriSign Time Stamping Services CA
        Issued by: Thawte Timestamping CA
        Expires:   04.12.2013 00:59:59
        SHA1 hash: F46AC0C6EFBB8C6A14F55F09E2D37DF4C0DE012D

            Issued to: VeriSign Time Stamping Services Signer - G2
            Issued by: VeriSign Time Stamping Services CA
            Expires:   15.06.2012 00:59:59
            SHA1 hash: ADA8AAA643FF7DC38DD40FA4C97AD559FF4846DE

Successfully verified: drivers/vboxdrv/VBoxDrv.sys

Number of files successfully Verified: 1
Number of warnings: 0
Number of errors: 0

C:Program FilesOracleVirtualBox_Oracle_Correct>

You see the old certificate (which is trusted by Microsoft) is the parent of the new certificate, which completes the trust of chain again. I guess this is only some temporary solution as long as Microsoft doesn’t release a new cross certificate (that’s why it is called intermediate). Luckily, you only need the intermediate certificates on the build machine. For your end users nothing has to be changed.

Conclusion

This article shows how a service provider make an easy task hard to do. Signing a kernel mode driver with the new certificate isn’t hard, but finding the right information is. Although there is an advisory from VeriSign, it doesn’t really explain what to do. As I believe in the future many other people will be in the same situation, I hope this article will save them from some sleepless nights.

Adding a badge to the unified toolbar on Mac OS X

Mac OS X and the applications running on it are known for being sometimes unusual in the look and feel. For some reason developer on Mac OS X seems to be more creative than on other platforms. For an application developer which deals with user input it is important to make any user interaction as useful as possible and present this information in a way which is on the one side as much less annoying as possible but also attractive and informative on the other side. Lastly I was thinking about how to show the users they are using a beta version, which should remind them that this is not production ready software, but on the same time make it easy to respond to bugs they find in this pre-release. The solution, I came up with, was a badge in the toolbar which shows this is a release which is definitely in a testing phase, but also allows the user to double-click to give a respond to this particular version. In the following post I will show how to do this.

Getting the superview

In Cocoa all user displayed content is a NSView (most of the time; forget about the Dock). This is really nice, cause you could manipulate them. Although there are no public methods for getting the NSView of the toolbar or even the titlebar, they exist as an NSView. The NSView of the toolbar could be accessed by a private method. As always in Objective C you could ask for a particular method by using the respondsToSelector statement like in the following:

NSToolbar *tb = [pWindow toolbar];
if ([tb respondsToSelector:@selector(_toolbarView)])
{
 NSView *tbv = [tb performSelector:@selector(_toolbarView)];
 if (tbv)
 {
  /* do something with tbv */
 }
}

This return the NSView of the toolbar at least until 10.6. But be warned this is a private method and of course this could be changed in a future version of Mac OS X. At least the shown method will correctly fail in the case Apple change his mind which will result in doing nothing. Anyway this will not include the area of the titlebar. To get the NSView which covers both the title bar and the toolbar you need another trick. The titlebar usual has a close, minimize or maximize button. These buttons are NSButton’s and added by the system depending of the window type. As a NSButton is also a NSView it also has a parent. This dependency allows us to access the view which is responsible for displaying the unified titlebar and the toolbar. The following code shows how to get the responsible view and how to add an additional NSImageView to it:

NSView *wv = [[pWindow standardWindowButton:NSWindowCloseButton] superview];
if (wv)
{
 /* We have to calculate the size of the title bar for the center case. */
 NSSize s = [pImage size];
 NSSize s1 = [wv frame].size;
 NSSize s2 = [[pWindow contentView] frame].size;
 /* Correctly position the label. */
 NSImageView *iv = [[NSImageView alloc] initWithFrame:
        NSMakeRect(s1.width - s.width - (fCenter ? 10 : 0),
                   fCenter ? s2.height + (s1.height - s2.height - s.height) / 2 : s1.height - s.height - 1,
  	           s.width, s.height)];
 /* Configure the NSImageView for auto moving. */
 [iv setImage:pImage];
 [iv setAutoresizesSubviews:true];
 [iv setAutoresizingMask:NSViewMinXMargin | NSViewMinYMargin];
 /* Add it to the parent of the close button. */
 [wv addSubview:iv positioned:NSWindowBelow relativeTo:nil];
}

This code needs a NSWindow, a NSImage as label and the flag fCenter for deciding if the image is vertically centered within the titlebar. Also the badge is pinned on the right side by setting the AutoresizingMask. The following shows how this could be look like:

Adding functionality to the badge

First we should add some information about this release by using the setToolTip method of an NSView. Simply add this call to the code:

 [iv setToolTip:@"Some info about the beta version."];

To make this beta hint more useful, we should make it clickable. Getting mouse down events in Cocoa is only possible by handling the mouseDown event of the NSResponder sub-class. Also the view must accept first responder events. How to do this is shown in the following code:

@interface BetaImageView: NSImageView
{}
- (BOOL)acceptsFirstResponder;
- (void)mouseDown:(NSEvent *)pEvent;
@end
@implementation BetaImageView
- (BOOL)acceptsFirstResponder
{
 return YES;
}
- (void)mouseDown:(NSEvent *)pEvent
{
 if ([pEvent clickCount] > 1)
  [[NSWorkspace sharedWorkspace] openURL:
        [NSURL URLWithString:@"http://www.virtualbox.org/"]];
 else
  [super mouseDown:pEvent];
}
@end

Replace NSImageView with BetaViewImage in the allocation call in listing 2 and you are done. Change the URL to one where the user can respond to the beta questions, like a bug tracker or forum.

Conclusion

This post showed how to add an nice looking badge to the unified toolbar on Mac OS X. The user is reminded he is using some pre-release software all the time, but at the same time has an easy way to report problems with this release. Of course could such a badge used for anything else.

Creating file shortcuts on three different operation systems

As you may know, developing for multiple platforms is one of my strengths. Strictly speaking, it’s a basic requirement if you are involved in such a product like VirtualBox, which runs on every major (and several minor) platform available today. Beside the GUI, which uses Qt and therewith is portable without any additional cost (which isn’t fully true if you want real native look and feel on every platform, especially on Mac OS X), all the rest of VirtualBox is written in a portable way. This is done by using only C/C++ and Assembler when necessary. Everything which needs a different approach, because of the design of the OS (and the API’s which are available there), is implemented in a platform dependent way. In the history of VirtualBox, several modules are created and grown by the time, which makes it really easy to deal with this differences. For stuff like file handling, paths, strings, semaphores or any other basic functionality, you can just use the modules which are available. On the other side it might be necessary, for a new feature we implement, to write it from the ground. In the following post I will show how to create a file shortcut for the three major operation systems available today.

Why do you want to use file shortcuts

On the classical UNIX systems you have hard and soft links. These are implemented by the filesystem and make it possible to link to another file or folder without any trouble. Most of the time soft links are used, but it really depends on the use case. Unfortunately these kind of links are not available on Windows (yes, I know there are also hard links and junctions on NTFS, but they are not common and difficult to handle), these links doesn’t allow any additional attributes. For example one like to add a different icon to the link or provide more information through a comment field. Beside on Mac OS X, shortcuts can also be work as an application launcher, where the link contain the information what application should be started and how. In contrast to filesystem links which are handled by the operation system, these shortcuts are handled by the window system (or shell) running on the host (which doesn’t mean there is no filesystem support for it). On Windows this is the Explorer, on Mac OS X the Finder and on Linux a freedesktop.org conforming file manager.

Creating a Desktop file on Linux

Desktop files on Linux (or any other UNIX system which conforms to freedesktop.org) is easy. It’s a simple text file which implement the Desktop Entry Specification. In version 1.0 there are 18 possible entries, where not all of them are mandatory. In the following example I use Qt to write these files, but it should be no problem to use any other toolkit or plain C.

bool createShortcut(const QString &strSrcFile,
                    const QString &strDstPath,
                    const QString &strName)
{
 QFile link(strDstPath + QDir::separator() + strName + ".desktop");
 if (link.open(QFile::WriteOnly | QFile::Truncate))
 {
  QTextStream out(&link);
  out.setCodec("UTF-8");
  out << "[Desktop Entry]" << endl
      << "Encoding=UTF-8" << endl
      << "Version=1.0" << endl
      << "Type=Link" << endl
      << "Name=" << strName << endl
      << "URL=" << strSrcFile << endl
      << "Icon=icon-name" << endl;
  return true;
 }
 return false;
}

Replace icon-name by a registered icon on the system and you are done.

Creating a Shell link on Windows

Windows provides an interface for IShellLink since Windows XP. The following example shows how to use it:

bool createShortcut(LPCSTR lpszSrcFile,
                    LPCSTR lpszDstPath,
                    LPCSTR lpszName)
{
 IShellLink *pShl = NULL;
 IPersistFile *pPPF = NULL;
 HRESULT rc = CoCreateInstance(CLSID_ShellLink,
                               NULL,
                               CLSCTX_INPROC_SERVER,
                               IID_IShellLink,
                               (void**)(&pShl));
 if (FAILED(rc))
  return false;
 do
 {
  rc = pShl->SetPath(lpszSrcFile);
  if (FAILED(rc))
   break;
  rc = pShl->QueryInterface(IID_IPersistFile, (void**)&pPPF);
  if (FAILED(rc))
   break;
  WORD wsz[MAX_PATH];
  TCHAR path[MAX_PATH] = { 0 };
  lstrcat(path, lpszDstPath);
  lstrcat(path, "\");
  lstrcat(path, lpszName);
  lstrcat(path, ".lnk");
  MultiByteToWideChar(CP_ACP, 0, buf, -1, wsz, MAX_PATH);
  rc = pPPF->Save(wsz, TRUE);
 } while(0);
 if (pPPF)
  pPPF->Release();
 if (pShl)
  pShl->Release();
 return SUCCEEDED(rc);
}

As you may noticed this uses COM. Many API’s on Windows using the COM interface to communicate between processes. If you don’t use COM in your application you have to initialize it first. This is achieved by adding the following call to the front of the function:

 if (FAILED(CoInitialize(NULL))
  return false;

Depending on your application it might be worth to unitialize COM after usage by appending the following to the function:

 CoUninitialize();

The function itself isn’t any magic. It gets a COM interface to the IShellLink interface and then work with it, by setting the source path and adding a target path by using the IPersistFile interface. As I wrote before you could do much more. Providing a path to a specific application or adding your own parameters is no problem. Have a look at the documentation.

Creating an Alias file on Mac OS X

Shortcut files on Mac OS X are a little bit different. At first, they aren’t one. There are the classical filesystem links and Alias files. Alias files are links which targeting a specific file, but they haven’t all the possibilities of shortcuts like on Windows or Linux. As the name suggest they are really only an alias for another file or directory. So specifying an application to start or things like that aren’t possible. Anyway they allow changing the icon and they are more persistent than on Window or Linux cause they are working with several attributes of the target file. Even if you rename or move the target, an Alias file will resolve the target correctly (if it is possible). On the other side, being such special means also being hard to create. In principle there are two possibilities. The first one is, creating a file which is no file at all, but has several resources forks attached. Therefor you need to know exactly how Alias files are built of and make sure with every release of Mac OS X you are following the development. There is a free project which does exactly that: NDAlias. If you are like me and a little bit more lazy, you ask someone who should know how to create Alias files. This is Finder. Although writing the files itself isn’t easy, asking the Finder to do the job is not really easier, cause the information about doing exactly that are really rare. The following code shows how to achieve it:

bool createShortcut(NSString *pstrSrcFile,
                    NSString *pstrDstPath,
                    NSString *pstrName)
{
 /* First of all we need to figure out which process Id the Finder
  * currently has. */
 NSWorkspace *pWS = [NSWorkspace sharedWorkspace];
 NSArray *pApps = [pWS launchedApplications];
 bool fFFound = false;
 ProcessSerialNumber psn;
 for (NSDictionary *pDict in pApps)
 {
  if ([[pDict valueForKey:@"NSApplicationBundleIdentifier"]
         isEqualToString:@"com.apple.finder"])
  {
   psn.highLongOfPSN = [[pDict
                          valueForKey:@"NSApplicationProcessSerialNumberHigh"] intValue];
   psn.lowLongOfPSN  = [[pDict
                          valueForKey:@"NSApplicationProcessSerialNumberLow"] intValue];
   fFFound = true;
   break;
  }
 }
 if (!fFFound)
  return false;
 /* Now the event fun begins. */
 OSErr err = noErr;
 AliasHandle hSrcAlias = 0;
 AliasHandle hDstAlias = 0;
 do
 {
  /* Create a descriptor which contains the target psn. */
  NSAppleEventDescriptor *finderPSNDesc = [NSAppleEventDescriptor
                                            descriptorWithDescriptorType:typeProcessSerialNumber
                                            bytes:&psn
                                            length:sizeof(psn)];
  if (!finderPSNDesc)
   break;
  /* Create the Apple event descriptor which points to the Finder
   * target already. */
  NSAppleEventDescriptor *finderEventDesc = [NSAppleEventDescriptor
                                              appleEventWithEventClass:kAECoreSuite
                                              eventID:kAECreateElement
                                              argetDescriptor:finderPSNDesc
                                              returnID:kAutoGenerateReturnID
                                              transactionID:kAnyTransactionID];
  if (!finderEventDesc)
   break;
  /* Create and add an event type descriptor: Alias */
  NSAppleEventDescriptor *osTypeDesc = [NSAppleEventDescriptor descriptorWithTypeCode:typeAlias];
  if (!osTypeDesc)
   break;
  [finderEventDesc setParamDescriptor:osTypeDesc forKeyword:keyAEObjectClass];
  /* Now create the source Alias, which will be attached to the event. */
  err = FSNewAliasFromPath(nil, [pstrSrcFile fileSystemRepresentation], 0, &hSrcAlias, 0);
  if (err != noErr)
   break;
  char handleState;
  handleState = HGetState((Handle)hSrcAlias);
  HLock((Handle)hSrcAlias);
  NSAppleEventDescriptor *srcAliasDesc = [NSAppleEventDescriptor
                                           descriptorWithDescriptorType:typeAlias
                                           bytes:*hSrcAlias
                                           length:GetAliasSize(hSrcAlias)];
  if (!srcAliasDesc)
   break;
  [finderEventDesc setParamDescriptor:srcAliasDesc
    forKeyword:keyASPrepositionTo];
  HSetState((Handle)hSrcAlias, handleState);
  /* Next create the target Alias and attach it to the event. */
  err = FSNewAliasFromPath(nil, [pstrDstPath fileSystemRepresentation], 0, &hDstAlias, 0);
  if (err != noErr)
   break;
  handleState = HGetState((Handle)hDstAlias);
  HLock((Handle)hDstAlias);
  NSAppleEventDescriptor *dstAliasDesc = [NSAppleEventDescriptor
                                           descriptorWithDescriptorType:t ypeAlias
                                           bytes:*hDstAlias
                                           length:GetAliasSize(hDstAlias)];
  if (!dstAliasDesc)
   break;
  [finderEventDesc setParamDescriptor:dstAliasDesc
    forKeyword:keyAEInsertHere];
  HSetState((Handle)hDstAlias, handleState);
  /* Finally a property descriptor containing the target
   * Alias name. */
  NSAppleEventDescriptor *finderPropDesc = [NSAppleEventDescriptor recordDescriptor];
  if (!finderPropDesc)
   break;
  [finderPropDesc setDescriptor:[NSAppleEventDescriptor descriptorWithString:pstrName]
    forKeyword:keyAEName];
  [finderEventDesc setParamDescriptor:finderPropDesc forKeyword:keyAEPropData];
  /* Now send the event to the Finder. */
  err = AESend([finderEventDesc aeDesc],
               NULL,
               kAENoReply,
               kAENormalPriority,
               kNoTimeOut,
               0,
               nil);
 } while(0);
 /* Cleanup */
 if (hSrcAlias)
  DisposeHandle((Handle)hSrcAlias);
 if (hDstAlias)
  DisposeHandle((Handle)hDstAlias);
 return err == noErr ? true : false;
}

Although the code above looks a little bit scary, it does not much. It fetch the process serial number of the current Finder process, creates an Application event for creating an Alias file and send this event to the Finder.

Conclusion

Beside showing how to create file shortcuts on different platforms, this article also shows which work is necessary to create platform independent code. It’s a simple example. But it also makes clear that one simple solution for platform one, not necessarily mean it’s such simple on platform two.

Making this easy accessible to any developer is the next step. I will leave this exercise to the reader, but have a look at the platform code of the VirtualBox GUI and the corresponding Makefile.

Understanding some of the mysteries of launchd

Have you ever wondered how Mac OS X knows which file type belongs to which application? On Windows there is the registry. An installer writes the necessary info into it. Most applications on Mac OS X doesn’t come with an installer, they are just moved from the downloaded DMG file to the /Applications folder. So a developer doesn’t have the ability to take action when the user “install” the application. Anyway there is no need to provide an installer for just this task, cause Mac OS X register file type associations on the first start of the application. In the following post, I will show how to do this, but furthermore I will show where this information is stored and how it could be reseted.

Providing the necessary information to Mac OS X

Applications on Mac OS X need some defined structure. They are so-called bundles, which means on the filesystem layer they are directories. You can prove this by checking the Applications directory within the Terminal.app. You could also right-click on an application and select “Show Package Contents”. The content of the bundle directory is usually hidden from the user when he works with the Finder or any other high level function of Mac OS X (like the open dialog). Additional to this layout on the filesystem, an application provide information about itself to the system with a plist file. This file has to be named Application.app/Content/Info.plist. The following shows exemplary the content of the Tunnelblick application:

<xml version="1.0" encoding="UTF-8"?>
<!DOCTYPE plist PUBLIC "-//Apple//DTD PLIST 1.0//EN" "http://www.apple.com/DTDs/PropertyList-1.0.dtd">
<plist version="1.0">
<dict>
 <key>CFBundleDevelopmentRegion</key>     <string>English</string>
 <key>CFBundleExecutable</key>            <string>Tunnelblick</string>
 <key>CFBundleIconFile</key>              <string>tunnelblick.icns</string>
 <key>CFBundleIdentifier</key>            <string>com.openvpn.tunnelblick</string>
 <key>CFBundleInfoDictionaryVersion</key> <string>6.0</string>
 <key>CFBundlePackageType</key>           <string>APPL</string>
 <key>CFBundleShortVersionString</key>    <string>3.1beta20 (build 2132)</string>
 <key>CFBundleSignature</key>             <string>OVPN</string>
 <key>CFBundleVersion</key>               <string>2132</string>
 <key>NSMainNibFile</key>                 <string>MainMenu</string>
 <key>NSPrincipalClass</key>              <string>NSApplication</string>
 <key>NSUIElement</key>                   <string>1</string>
 <key>SUEnableSystemProfiling</key>       <true/>
 <key>SUFeedURL</key>                     <string>http://tunnelblick.net/appcast.rss</string>
 <key>SUPublicDSAKeyFile</key>            <string>dsa_pub.pem</string>
</dict>
</plist>

The keys are mostly self explaining, you can find a full list here.

To register a file type association you have to add an array of the type CFBundleDocumentTypes. Again, here is an extraction of the Tunnelblick application, which shows the registration of the tblk extension:

 <key>CFBundleDocumentTypes</key>
 <array>
  <dict>
   <key>CFBundleTypeExtensions</key>   <array><string>tblk</string></array>
   <key>CFBundleTypeIconFile</key>     <string>tunnelblick_package.icns</string>
   <key>CFBundleTypeName</key>         <string>Tunnelblick VPN Configuration</string>
   <key>CFBundleTypeRole</key>         <string>Editor</string>
   <key>LSTypeIsPackage</key>          <true/>
   <key>NSPersistentStoreTypeKey</key> <string>Binary</string>
  </dict>
 </array>

You have to provide a file extension or mime-type, can add an icon and give a hint what your application can do with this type of file (viewer, editor or nothing).

Beside this passive way of announcing this information, there is also an active way (e.g. for use in an installer). See here for further information.

Where is this information stored

Although Mac OS X hasn’t a registry like windows, some information are stored in global databases, too. Applications are registered at the launchd. The launchd is the central place for starting all kind of programs, from a background service to any common application, like Thunderbird. E.g. background services can register itself and even made their start depending on different events. VirtualBox has an example configuration included, which let launchd start the vbox webservice on activity on a certain port. Although this isn’t used by many users out there (and therefore disabled by default), it shows some generic usage of this functionality.

If you look around in Mac OS X you have the tool launchctl, which allows you to start jobs or register background services with launchd. But it seems there is no tool which is able to get some information about the knowledge of launchd. Well, there is one. It’s a little bit hidden in /System/Library/Frameworks/CoreServices.framework/Versions/A/Frameworks/LaunchServices.framework/Versions/A/Support/lsregister. To be more comfortable with it, we should include it into the user path by linking it to a known path, like this:

sudo ln -s /Frameworks/CoreServices.framework/Versions/A/Frameworks/LaunchServices.framework/Versions/A/Support/lsregister /usr/local/bin/lsregister

With this tiny tool we are able to dump the launchd database. lsregister -dump | grep -n10 Tunnelblick displays something like this for Tunnelblick:

10823---------------------------------------------------------------------------------
10824-bundle    id:            6984
10825:  path:          /Applications/Tunnelblick.app
10826-  name:
10827-  identifier:    com.openvpn.tunnelblick (0x800097b8)
10828-  version:       2132
10829-  mod date:      10/31/2010 12:37:08
10830-  reg date:      11/19/2010 11:13:39
10831-  type code:     'APPL'
10832-  creator code:  'OVPN'
10833-  sys version:   0
10834-  flags:         relative-icon-path  ui-element
10835-  item flags:    container  package  application  extension-hidden  native-app  ppc  i386
10836-  icon:          Contents/Resources/tunnelblick.icns
10837:  executable:    Contents/MacOS/Tunnelblick
10838-  inode:         3800129
10839-  exec inode:    3800213
10840-  container id:  32
10841-  library:
10842-  library items:
10843-  --------------------------------------------------------
10844-  claim   id:            17864
10845:          name:          Tunnelblick VPN Configuration
10846-          rank:          Default
10847-          roles:         Editor
10848-          flags:         relative-icon-path  package
10849-          icon:          Contents/Resources/tunnelblick_package.icns
10850-          bindings:      .tblk
10851---------------------------------------------------------------------------------

As you see, all the information provided by the plist file is registered. Beside other information, it also has the registration and modification times stored. To let launchd reread the plist file, usual its only necessary to change the modification time of the application. This could be done by simply executing touch /Applications/Application.app. Anyway, it’s sometimes necessary to reset the content of this database for the own application. This could be done by executing the following:

lsregister -u /Applications/Application.app

To register the application again, just remove the -u parameter. You should also check if your application isn’t registered more than once, with different paths, by using the -dump parameter. To fully reset the launchd database, you could use -kill. This will remove any file type association and registered application. You have been warned.

Conclusion

This article shows how Mac OS X handle informations about installed applications. With this knowledge a developer is able to register the own application into the launchd ecosystem and see how launchd interpret this information. Furthermore, the usage of lsregister allows a developer to analyze the content of the launchd database and make changes to it.

Getting the backtrace from a kernel panic

You may know the following situation. You arrive in the morning in the office, do what you always do and check out the latest changes of the software you are working on. After a little bit of compile time and the first coffee you start the just build application. Bumm, kernel panic. After rebooting and locking through the changes you may have an idea what the reason for this could be. A colleague of you is working on a fancy new feature which needed changes to a kernel module. As you almost know nothing about this code you seek for help and, as it of course not happen on his computer, he is asking for a backtrace of this panic. You have two problems now. First you need to see the panic yourself and second it would be nice to get a copy of the backtrace for sharing this info within a bugtracker. In the following post I will show how both aims could be easily archived.

Let the kernel manage the graphical modes

As most people are working under X11 they don’t see the output of an kernel panic. When a kernel panic happens the kernel prints the reason for the panic and a kernel backtrace to the console window and stops immediately its own execution. It is not written into a log file or somewhere else. In consequence you don’t have the ability to look into the panic text, cause the graphical mode is still on. Historically the mode settings are done by the graphic driver of the X11 system. So the kernel has no idea that or which graphic mode is currently in use. Fortunately the kernel hackers invented a new infrastructure which let the kernel do the mode switch. This subsystem is called Kernel-Mode-Settings (KMS). As the kernel do the mode settings, he can switch back to the console on a panic, regardless which graphical mode is currently configured. Beside this, KMS has other improvements like Fast User Switching or a flicker free switch between text and graphic mode. On the other side is this highly hardware dependent and even if it was introduced with version 2.6.28, not all today available hardware can make use of it. If you are an owner of an Intel graphic card you are in good shape. Radeon and NVidia cards have limited support through the in kernel drivers radeonhd and nouveau. For an Intel i915 card you need to enable the following kernel options:

CONFIG_DRM_I915=y
Location:
-> Device Drivers
-> Graphics support
-> Direct Rendering Manager (XFree86 4.1.0 and higher DRI support) (DRM [=y])
-> Intel 830M, 845G, 852GM, 855GM, 865G ( [=y])

CONFIG_DRM_I915_KMS=y
Location:
-> Device Drivers
-> Graphics support
-> Direct Rendering Manager (XFree86 4.1.0 and higher DRI support) (DRM [=y])
-> Intel 830M, 845G, 852GM, 855GM, 865G ( [=y])
-> i915 driver (DRM_I915 [=y])

The kernel line in your favorite boot loader needs the following additional parameter:

i915.modeset=1

X11 should have this minimal configuration for the device section:

Section "Device"
 Identifier    "i915"
 Driver        "intel"
 Option        "DRI"   "true"
EndSection

Please note that you need of course some recent kernel, X11 version and Intel X11 driver to make this work. After a compile, install and boot of the new kernel, KMS should be in use. You will notice it, cause the boot messages will be printed in a much higher graphical resolution, than the usual text mode provide. The next time a kernel panic occurs, the kernel will switch back to the console before the panic is printed. This allows you to see the info printed and maybe you get a useful hint for the reason of the panic.

Post the panic

If you can’t use KMS or don’t want transcribe the panic text by hand into the bugtracker, it would be nice if the text could be made available on another computer. Kernel hackers usual use the serial port for that. Unfortunately most modern computers doesn’t have such a serial port anymore. Also you need two hosts with a serial port and the setup is complex (you have to know about baud-rates, parity and stuff like this). But there is a simpler solution: netconsole. Netconsole is a kernel module, which sends kernel messages anywhere to the net using UDP. The setup is really simple. In the kernel configuration you need the following setting:

CONFIG_NETCONSOLE=m
Location:
-> Device Drivers
-> Network device support (NETDEVICES [=y])

I prefer to compile it as module, which allows me to turn it on only when I need it. Load it with the following command:

modprobe netconsole netconsole=@/,@192.168.220.10/

The ip has to be replaced by the one of your target computer. You can of course tune it much more, like setting source and target ports or even let netconsole send the text to more than one host. On your client you need a network tool which can read from a socket and print the read text to stdout. Netcat or nc are two tools which are able to do just that. The call for nc looks like the following:

nc -l -u 6666

Now if a kernel panic will happen you will see an output like this:

BUG: unable to handle kernel NULL pointer dereference at (null)
IP: [] rb_erase+0x15c/0x320
PGD 6942f067 PUD a1e4067 PMD 0
Oops: 0000 [#1] SMP
last sysfs file: /sys/devices/virtual/block/md1/dev
CPU 3
Modules linked in: vboxnetadp vboxnetflt vboxdrv netconsole ...

Pid: 18887, comm: VirtualBox Tainted: G        W   2.6.36-gentoo #4 DG33TL/
RIP: 0010:[]  [] rb_erase+0x15c/0x320
RSP: 0018:ffff8800b430db58  EFLAGS: 00010046
RAX: 0000000000000000 RBX: ffff880069557a68 RCX: 0000000000000001
RDX: ffff880069557a68 RSI: ffff880001d8ed58 RDI: 0000000000000000
RBP: ffff8800b430db68 R08: 0000000000000001 R09: 000000008edcb5d6
R10: 0000000000000000 R11: 0000000000000202 R12: ffff880001d8ed58
R13: 0000000000000000 R14: 000000000000ed00 R15: 0000000000000002
FS:  00007fffde457710(0000) GS:ffff880001d80000(0000) knlGS:0000000000000000
CS:  0010 DS: 0000 ES: 0000 CR0: 0000000080050033
CR2: 0000000000000000 CR3: 00000000064f9000 CR4: 00000000000026e0
DR0: 0000000000000000 DR1: 0000000000000000 DR2: 0000000000000000
DR3: 0000000000000000 DR6: 00000000ffff0ff0 DR7: 0000000000000400
Process VirtualBox (pid: 18887, threadinfo ffff8800b430c000, task ffff880091e227f0)
Stack:
 ffff88000a03ba18 ffff880001d8ed48 ffff8800b430dba8 ffffffff8105bf06
<0> ffff8800b430dba8 ffffffff8105c97c ffff8800b430dbc8 ffff88000a03ba18
<0> 00004ff8a86ba455 ffff880001d8ed48 ffff8800b430dc48 ffffffff8105ce77
Call Trace:
 [] __remove_hrtimer+0x36/0xb0
 [] ? lock_hrtimer_base+0x2c/0x60
 [] __hrtimer_start_range_ns+0x2b7/0x3c0
 [] ? rtR0SemEventMultiLnxWait+0x250/0x3d0 [vboxdrv]
 [] ? RTLogLoggerExV+0x12f/0x180 [vboxdrv]
 [] hrtimer_start+0x13/0x20
 [] rtTimerLnxStartSubTimer+0x60/0x120 [vboxdrv]
 [] rtTimerLnxStartOnSpecificCpu+0x21/0x30 [vboxdrv]
 [] rtmpLinuxWrapper+0x23/0x30 [vboxdrv]
 [] RTMpOnSpecific+0x99/0xa0 [vboxdrv]
 [] ? rtTimerLnxStartOnSpecificCpu+0x0/0x30 [vboxdrv]
 [] RTTimerStart+0x2a6/0x2e0 [vboxdrv]
 [] ? g_abExecMemory+0x33665/0x180000 [vboxdrv]
 [] g_abExecMemory+0xc678/0x180000 [vboxdrv]
 [] g_abExecMemory+0x328d7/0x180000 [vboxdrv]
 [] supdrvIOCtlFast+0x6a/0x70 [vboxdrv]
 [] VBoxDrvLinuxIOCtl+0x47/0x1e0 [vboxdrv]
 [] ? pick_next_task_fair+0xde/0x150
 [] do_vfs_ioctl+0xa1/0x590
 [] ? sys_futex+0x76/0x170
 [] sys_ioctl+0x4a/0x80
 [] system_call_fastpath+0x16/0x1b
Code: 07 a8 01 75 9d eb 81 0f 1f 84 00 00 00 00 00 48 3b 78 10 0f 84 ...
RIP  [] rb_erase+0x15c/0x320
 RSP
CR2: 0000000000000000
---[ end trace 4eaa2a86a8e2da24 ]---

Normally only kernel panics are sent to the console. You can increase the verbosity level by executing dmesg -n 8 as root.

Conclusion

To continue with the story from the beginning: With the shown methods you can hope your colleague get enough information to find the reason for the kernel panic. To be more helpful, the next step would be to try to debug the problem yourself. Even if the KGDB was merged into the kernel in version 2.6.35, it is not really usable for me. The reason is that it seems kernel hackers usually have really old hardware which either has a serial port, a PS/2 keyboard or both. Otherwise I can’t find a reason why USB keyboards don’t work. I asked on the mailing list of KGDB about the status of USB keyboard support and I can only hope support will be integrated soon.