All posts by cp

The importance of fine-grained GPU preemption support for VR – Imagination Technologies

preemption
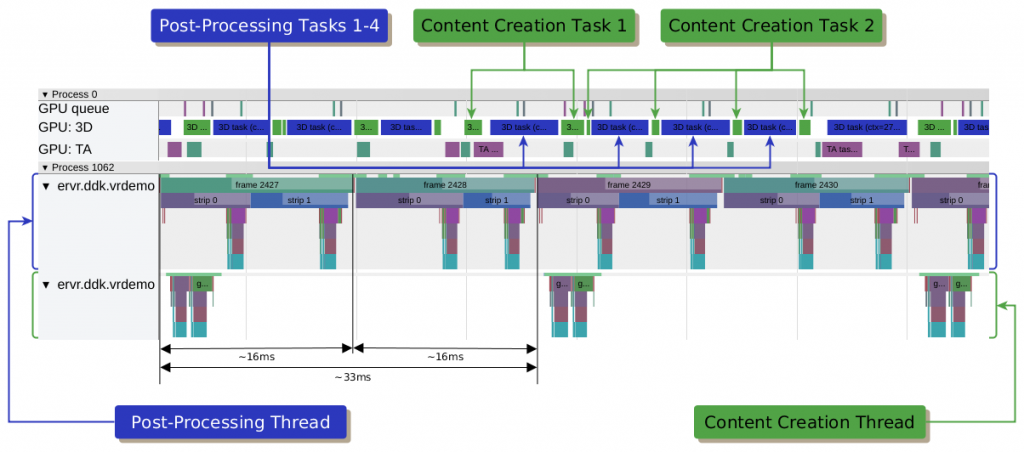
We show why fine-grained GPU preemption support in VR is important for advanced techniques like front buffer strip rendering or asynchronous time warping.

Source: The importance of fine-grained GPU preemption support for VR – Imagination Technologies

Reducing latency in mobile VR by using single buffered strip rendering – Imagination Blog

Reducing latency in mobile VR requires the support of many components in a smartphone, from the head motion sensor to the CPU and GPU and the display …

Source: Reducing latency in mobile VR by using single buffered strip rendering – Imagination Blog

SmartMirror project part 2: Software

In the first part of this series I looked into how to assemble a two-way mirror so that an Android phone behind it can be used as an information hub. Of course this is only one part of the story, cause we also need some software to display all this useful information on our Android device. Now, obviously there is already such software available, however I decided to write my own version from scratch for the following reasons:

  • to learn more about Android application development
  • it had to support Android Gingerbread (API level 10)
  • have all the modules important to me here in the UK
  • I like coding …

I will not fully describe all the code in this post, you can find the complete git repository here, but instead only pick the parts I think need some more detailed explanation. So lets start …

All about modules

I chose the common software pattern of  separating the final presentation of the data from the task of gathering it. All the data generation is done in modules which are independent of the UI. Most of those modules are using a remote web service for the information retrieval and therefore need to run asynchronous to the application main thread. By using OkHttp asynchronously for the remote access this is basically provided for free. A module is based on the abstract class Module which acts as connection to the UI. Every module will call postData when new data is available and postNoData when there is no data available or the module wants to clear any previous data it had sent. Obviously there are also some simple modules like the ClockModule which don’t use any web service, but also don’t need the complex asynchronies behaviour cause they executing rather quickly. Each module defines it own update rate cause this really depends on the nature of the data itself. Train time updates are rather frequent in contrast to the sunrise/sunset times which only change twice a day. Speaking about those two modules, let’s have a look which modules are available at the time of this writing:

  1. Time/Date: ClockModule
  2. Sunrise/Sunset: SunTimesModule
  3. Weather information from the UK Met Office: ForecastMetOfficeModule
  4. Travel time to work by car: TimeToWorkModule
  5. Next tube trains from a specific station: TflModule
  6. Next national rail trains from a specific station: NationalRailModule
  7. Upcoming calendar events for the next few days (API level >= 23): CalendarModule

Actually there is an eighth module called the TrainJourneyModule. This is a meta module combining the output of the tube and national rail train times modules into one. It sorts them by departure time so both types are shown interleaved.

For the data query part, Met Office, Tfl and Google Maps are using JSON. This is pretty standard nowadays and Java on Android has built-in support for parsing it. I was looking into more advanced JSON parsing libraries like gson and jackson but decided for the really simple task of parsing one static response it is not worth it to pull in those big dependencies. Maybe I will change that it the future, but for now the present code works just fine.

Looking at JSON data in Firefox is much more comfortable by using a JSON document viewer add-on like JSONView.

A completely different beast is the data query task for the National Rail module. National Rail uses the SOAP protocol and compared to JSON the authentication is already complicated. All web services use some type of API access token which is unique to every developer. This exists to prevent misuse of the public API, but in some cases also to limit the number of times an API can be accessed per day. To successfully prove to the National Rail web service that we are who we are we need to add an authentication token to the SOAP envelope header:

Namespace soap = Namespace.getNamespace("soap", "http://schemas.xmlsoap.org/soap/envelope/");
Namespace ldb = Namespace.getNamespace("ldb", "http://thalesgroup.com/RTTI/2014-02-20/ldb/");
Namespace typ = Namespace.getNamespace("typ", "http://thalesgroup.com/RTTI/2010-11-01/ldb/commontypes");
Element env = new Element("Envelope", soap);
/* Header */
env.addContent(new Element("Header", soap).
        addContent(new Element("AccessToken", typ).
            addContent(new Element("TokenValue", typ).
                addContent(BuildConfig.NATIONALRAIL_API_KEY))));

BuildConfig.NATIONALRAIL_API_KEY contains the API key. The rest of the body contains the actual request:

Element dep_request = new Element("GetDepartureBoardRequest", ldb).
    addContent(new Element("crs", ldb).
            addContent(BuildConfig.NATIONALRAIL_CRS)).
    addContent(new Element("numRows", ldb).
            addContent("5"));
...

Now, you may think this is simple enough, but I can assure you I needed quite some time to figure this out, cause the server on the other side is pretty strict on how this structure should look like. And as you can see SOAP uses XML which makes the request creation and the response parsing even harder. Luckily jdom2 exists which greatly simplifies this task. Here you can see the complete xml request:

<?xml version="1.0" encoding="UTF-8"?>
<soap:Envelope xmlns:soap="http://schemas.xmlsoap.org/soap/envelope/">
  <soap:Header>
   <typ:AccessToken xmlns:typ="http://thalesgroup.com/RTTI/2010-11-01/ldb/commontypes">
     <typ:TokenValue>6ef19def-6037-44f4-a2ac-06449273214f</typ:TokenValue>
   </typ:AccessToken>
  </soap:Header>
  <soap:Body>
    <ldb:GetDepartureBoardRequest xmlns:ldb="http://thalesgroup.com/RTTI/2014-02-20/ldb/">
      <ldb:crs>CHX</ldb:crs>
      <ldb:numRows>5</ldb:numRows>
    </ldb:GetDepartureBoardRequest>
  </soap:Body>
</soap:Envelope>

For more information on the various formats used by the different providers, have a look to their developer portals:

User interface

The user interface is quite simplistic. There is no way to interact with the application because it is behind a mirror. The only function the application has is to display the output of our modules in a nice and readable way. All the text and icons are white on black background. This ensures for best contrast behind the two-way mirror and makes it possible to see the information even on normal daylight. I tried to make all state changes animated, see for example AnimationSwitcher for the details. One interesting challenge is the code for switching to fullscreen for the different supported API levels. A nice feature of Android is that you can use new functionality of newer Android versions in your application and check at runtime if this new functionality is available. In your build.gradle you define the minimum supported Android version (minSdkVersion) and also the version your application is written against (targetSdkVersion). At runtime you check Build.VERSION.SDK_INT against the Android version when a specific feature was introduced. Only if this is equal or greater you can use this code. Now if you are below the required Android version you either need to fallback to other code providing similar functionality or your application can’t provide support for this particular feature (see e.g. CalendarView).  Main.java contains four different functions for switching into fullscreen. In API level 13 and below the only way to do this was to set the FLAG_FULLSCREEN for the main window. Starting with API level 14setSystemUiVisibility was introduced which allows a more fine grade configuration of the behaviour of the Android system when your application is in the foreground. Over the following Android versions more and more flags have been introduced.

Configuration

MirrorHub doesn’t come with any runtime configuration. Remember the user is not able to make any changes when the phone/tablet is attached to the mirror. All the configuration is done at compile time by setting the various options in the gradle.properties file. You can use gradle.properties.example as the start for your own experiments. It contains things like the location for the weather forecast or the tube/train station you like to have departure information displayed on your mirror. But most importantly it contains the API keys for the various web services in use as outlined here.

I also added a runDebug/runRelease task to gradle which allows you to start the application without any physical interaction with the device. Together with an app like WiFi ADB you can install and run the application remotely while the device is attached to the mirror. However, please note that WiFi ADB needs a rooted device.

Final thoughts

I think the app has a lot of nice feature already. It runs on my mirror 24/7 and works just fine. I still have some more ideas for modules, like a caldav module to display calendar events from a caldav server, because the Android version that I use has no direct calendar support. I also played around with the proximity sensor to detect some hand waving in front of the mirror. It works fine with just the device, but unfortunately not when the phone is behind the mirror. The code is still there, so if you have some ideas how to make something like this work let me know in the comments.

Finally here are some screenshots while MirrorHub is running:

For some images together with the mirror see the end of the first post.

SmartMirror project part 1: Hardware

A while ago I stumbled over an article about a smart mirror using some old unused Nexus 7 as the driver. I was instantly fascinated by this project because it is low-cost, needs some real world handcraft and of course involves writing some new code. Obviously the last part is my favourite bit so I quickly came up with some new ideas which where not available in the original software. However, I will come to that part later in a separate post. I still had my trusty old HTC Desire in the cupboard and after proofing it still works I decided to give it a go. This first post will guide you through the really simple process of making the base for the mirror. It will not involve any liquid glue … I promise 🙂

Parts you need

The following is a list of items you need for this project. I added links to the items I used:

  1. two-way acrylic mirror (I made it A4 in size, but a little bigger is probably better)
  2. black card sheets (I used size A3; in any case it should be bigger than your mirror)
  3. double-sided clear tape
  4. cardboard
  5. Android phone/tablet
  6. scissors

As you notice this is basically just plastic and cardboard which makes the final mirror reasonably light.

Assembling procedure

First I cut four pieces of cardboard to the size of the mirror. Four of them stacked together matched roughly the thickness of my phone and you may need more or less layers depending on the thickness of your phone/tablet and how thick the cardboard itself is (Pic. 1). I stuck one by one together using the double-sided tape. After deciding that the screen should be in the lower right corner I placed the phone on the cardboard and drew around it (Pic. 2). Make sure there is enough space on all the sides for the tape. The hard part of cutting out the shape of the phone from three layers of cardboard had to be done next (Pic. 3/4). I did the last layer in a separate step and skipped the cut-out of the usb cable shaft. This gives the structure a bit more strength.

The black card sheet will serve two purposes:

  1. shield the light of the phone buttons/battery indicator from being visible through the mirror
  2. make the base looking more … well … nice

I cut one black card sheet 2 cm bigger than the mirror on each side and stuck it on the back of the cardboard. Than I bended the overlapping part to the front and fixed it with tape as well (Pic. 5). Now again you need to cut out the phone shape. A black card sheet the size of the mirror now goes on the front of the cardboard. Next you need to be careful! Just cut out a rectangle the size of your active phone screen, excluding  any buttons and the bezels (Pic. 6). I did this in several steps making sure not to remove too much. Finally stick the plastic mirror on the front of the cardboard.

Conclusion

As you see in picture 7 and 8 this came together quite well. If I would do it again I would probably go for a bigger mirror around the size of A3. Also I would make the base slightly smaller than the actual mirror so that it looks a bit more free-standing.

In the next post I will talk about the software you can see in the pictures, but if you are curious you can have a look at my github repository.

TT: Uni-directional file synchronization between different hosts with Unison

When you work with at least two computers on the same project on a daily basis you might have a problem. You need to get changed files from host A to host B and vice versa. The problem getting bigger when you work in addition on different operation systems or use more than two hosts. On UNIX/Linux the preferred tool for such a task is Rsync. Unfortunately Rsync synchronize only in one direction, it doesn’t work very well when more than two hosts are involved (and it isn’t really comfortable to set up on Windows) and can’t use a secure communication channel. Another approach is to check-in changed source files into a version control system, like CVS. On host A you check it in and on host B you check it out afterwards. But this means you always need a more or less stable variant of your code, so that other developer can, at least compile, or much better use it. That is not always the case (especially when you leave the office at 11:00 p.m.) and it also doesn’t cover files which aren’t handled by a version control system. Luckily there is a solution for all the problems mentioned which is called Unison. So here comes the second post in the ToolTips series, which covers an easy and portable way for file synchronization.

Installing Unison

Most modern Linux distributions include Unison in their package manage system. On Mac OS X you can use MacPorts. Alternatively you could download a binary version for Mac OS X or Windows here. To prevent surprises and unnecessary trouble it might be a good idea to make sure that every involved system use the same version of Unison. At least on Linux and Mac OS X it is relatively easy to compile Unison from the sources.

Setting up public/private key authentication for ssh

One advantage of Unison over Rsync is that you can use different communication channels for the file transfers. One is ssh. As I always prefer/demand encrypted communication this is a big plus of course. In the default setup you can just use ssh. But for a little bit more comfort I suggest to create a public/private key pair for the authentication.
The following creates public/private keys without a password. Although this is much more easier to use, it should be only used on hosts which are trusted. If you are in doubt, use the normal password approach or even better create a public/private key pair with a password. Create a new public/private key pair with the following command:

user@host-a ~ $ ssh-keygen -t rsa

When you are asked for a password just hit Enter twice. The command creates the private key in ~/.ssh/id_rsa and the public key in ~/.ssh/id_rsa.pub. Now copy the public key to host B:

user@host-a ~ $ scp ~/.ssh/id_rsa.pub host_B:.ssh/authorized_keys

If you already have some public keys on host B, make sure you append the new key and not overwrite the file by the above command. Make the file accessible by the user only with:

user@host-b ~ $ chmod 600 ~/.ssh/authorized_keys

Now you should be able to connect to host B without any interaction needed.

Configuring Unison

Like in the long UNIX tradition, Unison is configured using text files. The files are located in the ~/.unison directory. You can configure more than one synchronization target by choosing a meaningful name. There exists one default target which is configured in the file default.prf. Because I have more than one target I prefer to split the configuration into several files. You can include other project files with the include statement as shown here:

# directory on host a (this is where Unison will be executed)
root       = /mnt/data/projects
# directory on host b (this is the remote host)
root       = ssh://host-b//mnt/data/projects
# which directories to sync?
include projects_files.prf
# options
include options.prf
ignorecase = false
# unison executable on the server
servercmd  = /usr/local/bin/unison

We setup the root directories on both machines, including the configuration file for the project target and some generic option file. We also overwriting the default unison location, because this is a self compiled version. The file options.prf looks like this:

# No staled nfs and mac store files
ignore  = Name .nfs*
ignore  = Name .DS_Store
# options
log     = true
rsrc    = true
auto    = true
#debug   = verbose
#logfile = ~/.unison/unison.log

This just set some generic options which are valid for all my targets. For the specific target projects the file projects_files.prf contains mainly the directories and files which should be ignored:

# No ISOs
ignore    = Path vms/ISO
# Ignore VBox branches
ignore    = Path vbox-*
# No binary output from the other platforms
ignore    = Path vbox*/out/*
# One exception:
ignorenot = Path vbox/out/linux.amd64.additions
# No wine stuff
ignore    = Path vbox*/wine.*
# Tools
ignore    = Name vbox*/tools/{FetchDir,freebsd*,os2*}

So in general, you configure the directory to synchronize and later define directories or files which should be ignored. As you see, you can include or exclude paths as you like. Even simple bash wildcards are possible. As shown in this example I exclude all binary files of a VirtualBox build, because they are useless on another platform. Understanding how Unison decide which directories or files should be synchronized is sometimes difficult. So I suggest to carefully read the documentation and just use the “try and failure” approach ;). Another reason for splitting up the configuration files is you can synchronize these files as well. I have another target which synchronize several configuration files, e.g. .bashrc, .profile, .vim* and the sub-project files of Unison like the projects_files.prf. You can’t synchronize e.g. default.prf, cause the root directories are different from host to host, but the general configuration is always the same. My home target looks like this:

# Which directories/files to sync?
path = .bashrc
path = .ion3
path = .gdbinit
path = .cgdb
path = .valgrind-vbox.supp
path = .vim
path = .vimrc
path = .gvimrc
path = .Xdefaults
path = .gnupg
path = .unison/options.prf
path = .unison/home_files.prf
path = .unison/projects_files.prf
# Do not sync:
ignore = Path .vim/.netrwhist
ignore = Path .ion3/default-session*
ignore = Path .cgdb/readline_history.txt

One of the strengths over other synchronization tools is, you can do this for others host as well. So if you synchronize between host a and host b you can also synchronize between host c and host b. However, a little bit of discipline is necessary. There should be one host which all other host synchronize again.
If you now execute unison the project target will be used. If you execute unison home the files of the home target will be synchronized.

Conclusion

Unison is a very powerful tool. You can synchronize between more than two hosts (OS independent), in a secure way and uni-directional. Currently there is no better tool and I use it on a daily basis.

FRITZ!Box tuning part 4: Cross-building and installing additional applications

The articles I wrote about the FRITZ!Box are pretty popular. They are creating the most traffic on my website. I understand this, cause the FRITZ!Box is a really great piece of hardware and AVM is also a company which knows how to make their users happy by serving regular updates to the firmware. Although I didn’t tuned my FRITZ!Box any further, I updated it with the latest Labor firmware version regularly. At some point the sshd setup (with dropbear) doesn’t worked anymore and I decided it is the time to update my software as well. Beside that it didn’t work anymore it is always a good idea to update software which allow access to a host from everywhere very regularly. Anyway, it turned out this isn’t as simple as I initial thought. Therefore here is the next post in the FRITZ!Box tuning series, which shows how to cross-build software for the MIPS32 architecture used in the FRITZ!Box and in particular get the sshd software to life again. I use a FRITZ!Box Fon WLAN 7270 v2 and the firmware is 54.05.05. Please make sure you read the other FRITZ!Box articles as well, cause some of the information given there still applies.

As already mentioned in the other articles, there is no warranty that this will work on your side and I am not responsible for any damage which may happen. You have been warned!

Cross-building for the MIPS32 architecture

The FRITZ!Box itself doesn’t include any build tools. Why should it! It’s an end-consumer product which is usually never changed, beside the user is updating it with an official firmware update. So we have to do it ourself. Creating a build chain for another architecture is usually hard. There are several things you have to consider. This includes problems with the configuration, endianess differences between the host and the target, bit depths and depending shared libraries which have to be available in the target format. Fortunately this is a common problem, especially for embedded systems, which means there is a proper solution called Buildroot (look at the first line in dmsg, when the FRITZ!Box has booted and you know what I mean). Buildroot is a build system which allows, similar to the Linux kernel, configuring and generating complete embedded Linux systems. Regardless how configured, Buildroot builds a complete Linux system, always. This is of course a little bit overhead for us, but we just pick out the relevant files. First we need to know which architecture we target. You have to login into the FRITZ!Box either using telnet or a working ssh daemon. To get some information about the hardware used in your FRITZ!Box execute cat /proc/cpuinfo.

# cat /proc/cpuinfo
system type             : TI UR8 (7270)
processor               : 0
cpu model               : MIPS 4KEc V6.8
BogoMIPS                : 359.62
wait instruction        : yes
microsecond timers      : yes
tlb_entries             : 16
extra interrupt vector  : yes
hardware watchpoint     : no
ASEs implemented        :
shadow register sets    : 1
core                    : 0
VCED exceptions         : not available
VCEI exceptions         : not available

Here we learn that the FRITZ!Box is using a MIPS processor. In this case it uses the little-endian format. Next you need some information about the system C library. On normal Linux (desktop) systems the GNU C Library is used. This library is heavyweight and therefore the uClibc was invented for embedded systems. By executing ls /lib/libuClibc* you get the version installed. In my case it is 0.9.31. Now we have all information needed to configure Buildroot. Download and extract the source of Buildroot.

If you are working on a Mac like me (where Buildroot doesn’t work), VirtualBox with a Linux system as a guest is a good alternative ;).

By executing make menuconfig in the root directory of Buildroot you are able to configure it. The most important options are Target Architecture, set this to mipsel and Target Architecture Variant, set this to mips 32r2. In Toolchain -> uClibc C library Version select a version which is close to the one on your FRITZ!Box. Next you have to select which packages should be build in Package Selection for the target. Choose whatever you want but for the beginning Networking applications -> openssh might be enough. If you prefer a more lightweight ssh implementation dropbear may also an option. In the following we use OpenSSH. You can also tweak the build options, like the gcc version to use or set the gcc optimization level to -O3 in favor of size. After saving the configuration and executing make, it is time for a coffee. When the build has been finished all relevant files are in output/target/. We only pack the directories and files which are necessary. For example the libuClibc was built by Buildroot, but we will use the one from the FRITZ!Box. The following create a zip archive of the files for OpenSSH.

zip -r ../../local.zip "lib/libutil* lib/libnsl* lib/libresolv* 
 lib/libcrypt* usr/lib usr/share usr/sbin usr/bin etc/ssh_config 
 etc/sshd_config"

Creating overlay directories on the root filesystem

The following is based on ideas invented by the guys at http://www.spblinux.de/. Our aim is it to have as little persistent changes on the FRITZ!Box as possible. This allows us to go back to the original state with a simple reboot. Therefore all writeable directories will be on a tmpfs filesystem. tmpfs filesystems are created in RAM and the content will be removed when the filesystem is unmounted. Because the FRITZ!Box has only limited RAM, we will not copy our applications into the tmpfs filesystem, but just create symbolic links to the files on the USB stick (where usually much more space is available). Because we want the applications from the FRITZ!Box and our own one be accessible from the root filesystem, we need to merge both into the tmpfs directory. Therefore first symbolic links into the original filesystem and second symbolic links to the USB stick are created. The second step is only performed when there isn’t a file already. This makes sure the original files are always preferred over our own one. The last step is binding the directories to the root filesystem. Summarized the following will be done:

  1. remount / readonly
  2. mount / into /var/_ro_
  3. create tmpfs in /var/_overlay_
  4. symlink the files from /var/_ro_ into /var/_overlay_
  5. symlink the files from the USB stick into /var/_overlay_
  6. bind the directories in /var/_overlay_ to /

This script does the previous steps. It uses helper methods which are defined in common.sh. You will find all the necessary files in the package you can download at the end of this article.

#!/bin/sh
 
. common.sh
 
MNT=/var/_overlay_
BASE_RO=/var/_ro_
BASE_OVL="${BASE}/local"
 
DIRS="lib etc usr/bin usr/sbin usr/lib usr/share"
 
# remount root readonly
"${MOUNT}" | "${GREP}" "/dev/root" | "${GREP}" -q ro
[ $? -eq 1 ] && _lmt /dev/root / "-o remount -r"
# bind root into var
_lchkmnt "${BASE_RO}"
if [ $? -eq 1 ]; then
  _lmkdir "${BASE_RO}"
  _lmnt / "${BASE_RO}" "-o bind"
fi
 
# create our overlay dir
_lchkmnt "${MNT}"
if [ $? -eq 1 ]; then
  _lmkdir "${MNT}"
  _lmnt tmpfs "${MNT}" "-t tmpfs"
fi
 
# link/copy the base stuff
for i in ${DIRS}; do
  _lsymlnk_dir "${BASE_RO}" "${i}" "${MNT}"
done
 
# link/copy our own stuff
for i in ${DIRS}; do
  _lsymlnk_dir "${BASE_OVL}" "${i}" "${MNT}"
done
 
# now bind all overlay dirs to root
# (this is critical don't interupt)
for i in ${DIRS}; do
  _lmnt "${MNT}/${i}" "/${i}" "-o bind"
done
 
exit 0

Now copy the zip archive you have created above to the FRITZ!Box and unpack it on the USB stick in addons/local/. The scripts have to be placed into addons/. You need to configure the following in common.sh:

# the base of the usb stick goes here:
BASE="/var/media/ftp/FLASH-DISK-01/addons"
# add the encrypted root password here:
PASS=""

Point to the base directory within the USB stick in BASE. Also add your encrypted root password into PASS. This will create a root user in /etc/passwd automatically.

If you believe all is correct, you can start the installation by executing ./install.sh. If no errors are shown, you can try ssh. ssh -v should output something like this:

# ssh -v
OpenSSH_5.8p2, OpenSSL 1.0.0d 8 Feb 2011
...

Additional to the standard filesystems mounted, you should see the following when executing mount:

# mount
...
/dev/root on /var/_ro_ type squashfs (ro,relatime)
tmpfs on /var/_overlay_ type tmpfs (rw,relatime)
tmpfs on /lib type tmpfs (rw,relatime)
tmpfs on /etc type tmpfs (rw,relatime)
tmpfs on /usr/bin type tmpfs (rw,relatime)
tmpfs on /usr/sbin type tmpfs (rw,relatime)
tmpfs on /usr/lib type tmpfs (rw,relatime)
tmpfs on /usr/share type tmpfs (rw,relatime)

Configure and start the OpenSSH daemon

Now that we have our brand new OpenSSH on the FRITZ!Box working, we need some last steps to let the daemon running correctly. First create a private/public RSA host key pair for the server process by executing:

ssh-keygen -t rsa -f addons/config/ssh_host_rsa_key

addons/config/ have to be an existing directory below the USB stick base. Next create a file addons/config/sshd_config in the same directory with the following content:

Protocol               2
UsePrivilegeSeparation no
Subsystem              sftp /usr/lib/sftp-server

The following script could be use to start the sshd:

#!/bin/sh
 
. common.sh
 
SSHD="/usr/sbin/sshd"
SSH_SPKEY="${BASE}/config/ssh_host_rsa_key"
SSH_CFG="${BASE}/config/sshd_config"
SSH_TPKEY="/var/tmp/ssh_host_rsa_key"
 
# sanity check
[ ! -e "${SSHD}" ] && _lce $? "sshd not installed"
 
# start in tmp
cd /var/tmp   
 
mount -o remount devpts /dev/pts -t devpts
 
# cp key and make them user readable only
_lcp_file "${SSH_SPKEY}" "${SSH_TPKEY}"
_lchmod 400 "${SSH_TPKEY}"             
 
# start sshd
"${SSHD}" -f "${SSH_CFG}" -h "${SSH_TPKEY}"

Please note that you have to set up the root user first and maybe adjust your port forwarding rules to allow access from the Internet as described in this post. The package will contain a script startup.sh which will add the root user automatically.

Here is the obligatory screenshot which shows htop with color terminal support. You see OpenSSH and OpenVPN in the list of the running processes.

Conclusion

Thanks to Buildroot it is pretty easy to cross-build for embedded machines these days. With some tricky directory rebinding new applications could be injected into the FRITZ!Box root filesystem without overwriting the existing firmware. Now you should be able to build any software already bundled with Buildroot or even add new one to the build process. Happy cross-building!

You can download the scripts and binaries discussed in this post:
FRITZBox_OpenSSH_5.8p2.tar.gz (3.8MB, SHA1)

TT: Console navigation the easy way with Apparix

Today I will start a new series where I present small tools which I use on a daily basis and considered very useful. These tools haven’t to be killer applications, but doing the task they are written for, very well. Therefor also the name of this series: TT, which stands for ToolTips. Most of this applications are open source, so I will take the opportunity to say “Thank you” to all the people out there, which create such cool stuff in there free time.

We start with a tool called Apparix.

Console?

As you may know, I’m a keyboard addict. My preferred OS is Linux, I use Ion3 as the window manager, rxvt-unicode as terminal application and (g)Vim as the preferred editor. On the other side I have a MacBook Pro as laptop and love the possibilities of Mac OS X. How does this come together? Well, all these tools are available on Mac OS X as well. The X11 port of Mac OS X is getting better with each release and using it in fullscreen is good enough. Mac OS X is based on BSD and together with MacPorts, there is nothing I missed until today. As I have to work really platform independent, there is Windows. Vim is available, but working console based (read: command.com) isn’t really much fun. There is of course mingw, but I never managed it to create a work environment like on Linux/UNIX. Anyway, I work not that much on Windows, so I can live with other tools there as well (a really good free editor is Notepad++ and if you hate Explorer have a look at Altap Salamander). So the question remains: Console? I have the feeling using the keyboard within a console application is much faster than clicking around with the mouse. This doesn’t mean I like to type every single character when starting an application or changing the current working directory. Many modern command interpreters, like the Bash, have built in word expansion. This allows you to use the tabulator key for fast expansion of typed characters for a given set of commands. Of course this makes the console life much more easier. But there is more!

Bookmarking important directories

Usually, I’m working on projects. One project is VirtualBox. Other might be some private stuff, like personal letters or other development I do. As the regular user organize his projects in directory trees it make sense to bookmark them. Most people believe bookmarking is something Internet specific, but this isn’t true. Bookmarking means getting access to an important information very fast, without remembering the exact location of this information. This is exactly what Apparix does. It bookmarks directories and make these bookmarks easy accessible on the console. So I have bookmarks for sub-projects within VirtualBox, like the GUI or Main. Getting there is as easy as writing to vgui. It’s the same as writing cd /bin and it even provide word expansion of the available bookmarks. In this case the bookmark is vgui and it expand to the GUI directory within the VirtualBox source tree.

How does this work?

Installing Apparix is pretty simple. You will find all the information on the website. The important part is the integration within your shell. You need to extent your .bashrc. One way is to add the functions you need into .bashrc. Alternatively you can download the file .bash_apparix and source it in your .bashrc. When you have done this and start a new shell, you should navigate to a directory you like to bookmark. There you type bm to create your first bookmark. Afterwards, regardless what your current working directory is, you could execute to DIR_NAME to get there. Of course you can name the bookmark other than the current directory name, by using bm MY_NAME. By executing als all bookmarks are shown. There is much more possible of course. See the documentation for more information. Anyway, this is the main use case for Apparix, so there is not much more to say. Really?

Using the Apparix database for other applications

The cool thing on many Linux applications is, they are saving their data in simple text files. Also Apparix. The bookmark “database” is saved in a file called .apparixrc. It’s a simple text file, which is easy to parse. It looks like this:

j,vbox,/Users/poetzsch/projects/vbox
j,VirtualBox,/Users/poetzsch/projects/vbox/src/VBox/Frontends/VirtualBox
j,Main,/Users/poetzsch/projects/vbox/src/VBox/Main
j,Runtime,/Users/poetzsch/projects/vbox/src/VBox/Runtime
j,Installer,/Users/poetzsch/projects/vbox/src/VBox/Installer/darwin
j,cv,/Users/poetzsch/projects/private/office/latex/cv
j,dow,/Users/poetzsch/Downloads

This allows the usage of this information in other contexts as well. One example is Vim. As I mentioned earlier, this is my main editor. So it would be cool to use the bookmarks, I already have, there as well. To easy change the current directory in Vim, add the following to your .vimrc:

command! -complete=custom,BmCe -nargs=1 To :call BmTo('<args>')
fun BmCe(A,L,P)
 return system("awk 'BEGIN{FS=","}/j,/{print $2}' ~/.apparixrc")
endfun
fun BmLs(dir)
 return system('apparix '.a:dir.' | tr -d "n"')
endfun
fun BmTo(dir)
 execute ':cd '.BmLs(a:dir)
endfun

After restarting Vim, it is possible to navigate with :To MY_BOOKMARK to any directory known by Apparix.

Conclusion

One simple task, getting to a directory where you are often have to be, with one simple solution. Thats all to say about Apparix. It does this in a very simple way, which is fully integrated into the Bash and the saved information could be used by other applications as well.

Test, 1, 2, 3, test, test

Everybody know these words. You say it when you have to check a microphone which were plugged into some sound system. It’s just test if the microphone is working well and the spoken words are reflected by the amplifier. It’s a simple test to check the functionality of the microphone or the whole sound system. Why should I write about sound systems? No, I don’t try to learn playing a guitar or any other instrument, I like to share some thoughts about software testing. After writing a post about Valgrind, I had the feeling that I should try to show some ways of testing software. In the following post I will analyze what can be tested, what is useful and which tools are available. I don’t aim to make a full overview of software testing itself, I just like to highlight some tools (or thoughts) which are useful and every developer should know of.

Why should I test my software

This is easy to answer. Humans write software and humans tend to make mistakes. Even if something is working perfect, a bug fix or new feature can break it. Testing software will not prevent you from bugs, but it can boost your user satisfaction a lot, by removing errors which are common and avoidable.

What can be tested

First of all, you should think about what should be tested at all. The following list tries to categorizes different tests from a technical perspective:

  1. Static tests
  2. Compile time tests
  3. Runtime test

Also we have to differ between automatic tests and manual tests done by an operator. In the following I will prioritize the automatic tests, simply because once they are setup, they are easier to handle. Manuel tests means, setting up a test plan, making someone responsible for checking the test plan and forcing the test to be done before a release. On the other side automatic tests could be done by a machine at day and night with every software level your application is currently in.

Static tests

Static tests analyze the code base and try to predict error paths. There are several applications on the market, but most of them are not free. First you need a product which speaks your language. If you develop in C, C++, Java, C# or whatever makes a huge difference here. There are many static analyzer out there which can analyze C, but not many can successfully parse any of the widely used higher programming languages. One of them, which can analyze C++, is Fortify. Fortify uses rules to find different errors a developer can do. There are of course default rules, but a developer can define rules himself. This product is specialized in detecting errors which may end in security holes. One such error in terms of security considerations is file input handling. When one is reading a string directly out of a file, some assumptions are done. Strings in the C/C++ world are zero terminated. All string handling/manipulation function, which are available e.g. from the glibc, are working over the single characters as long as they didn’t find the termination byte. Now, if a developer is reading a string out of a file and doesn’t check if the terminating zero is there, he open a security hole. If an attacker is using this knowledge he is able to provoke a buffer overflow. Fortify can detect such blindly faith to input data. Of course it can detect much more. On the down side, as most software projects are really complex, static code analyzer tend to produce many false/positive. Working through this false/positive and defining filters for the own software project needs much time. On the other side these tools help in finding error paths, which even runtime tests doesn’t show, cause they are so unusual. But exactly these errors are used by attackers to abuse your software for bad things.

Compile time tests

Compile tests make sure your application compiles on different architectures, bit depth, or with other resources like external dependencies (e.g. depending third-party libraries). They are important when you develop for and/or if your team is using different platforms. They make sure a software is at least compiling on every important system. This doesn’t mean the current status works well, it just makes sure every developer involved in the progress of the product is able to build an actual version, even if he is working on a different part of the software itself. Such a situation happens often in open source products, like Mozilla, which invented tinderbox for making these tests. It allows you to set up different build environments for your software and watch the result of every check-in you made in terms of compatibility to this environment. The following shows a screenshot of the Firefox-Ports tinderbox with one broken build box. As everybody know, red is bad:

Red means a burning tree. It shows you that your last check-in doesn’t compile on a specific system. The cool thing is that you can look at the log and spot the error with ease. You know why it doesn’t compile and can fix it. This will prevent you from being blamed by other team members because they can’t work with the current trunk.

Runtime tests

Runtime tests are of course the biggest part of testing. They try to make sure the application does the job it was written for. This also means these tests are the hardest one. It may help to try to separate them as well. I use the following separation:

  1. Unit tests
  2. Dynamic analyzer
  3. GUI tests

Unit tests

Unit tests check that the specialized functionality a unit provide is working correctly. A well-known example is string handling. String handling is necessary in almost all software projects out there. May it printing the help section of a command line tool or the information presentation in an GUI application. A unit test tries to test anything a user of this unit may do with it. This could be adding a string to another, replacing parts of a string, converting a string to other formats (like to another encoding or to an integer) or much more complex operations like searching within a string with a regular expression. All these operations could be relatively easy tested with unit tests. There is no general usable software out there which could be used for unit testing, but most software frameworks offer some help to write unit tests. Qt has a unit test framework and VirtualBox has a integrated system, as well. Here is a screenshot from a just announced graphical tool by Nokia, which makes spotting errors in Qt unit tests much more easier. The second screenshot shows the output of a VirtualBox unit test.

Please also note that unit testing not just means testing functionality. It could also mean testing performance regression. If some function needed an amount of time in an existing version, it should be at least equal or faster in means of execution time in a new version. Unit tests are evolutionary like the software itself. It is illusionary to believe a unit test is finished sometime. The test will/should grow as long as users will report errors. Often a unit test is called by the bugtracker id, which showed some specific problem the first time.

Dynamic analyzer

This field of testing is a little bit different from the other one, cause the developer needs to interact here. Although it would be possible to automate some of these tests, they are more designed to be done by the developer from time to time (usually after a feature is completed) to check for some basic errors. The most common dynamic analyzer in the open source world is the Valgrind instrumentation framework. It has a tool for checking memory management errors, like I showed in this post. As already written there, memory leak errors can happen to everyone, so having a tool for finding and eliminating them, is very useful. On the other side there is a tool called Callgrind, which profiles a given software in detail. After profiling some software, a developer is able to see execution times relatively to each other. This makes it possible to find the places an algorithm spend the most time. With this information a developer has the chance to find bottlenecks, which maybe could be eliminated. Beside that, is the knowledge of the call graph sometimes from great information, especially if you develop graphical applications, like in Qt. Having events, slots or asynchrony window systems, like in X11, make it sometimes hard to predict how the code will flow. It may also be helpful in deciding if some subroutine is a candidate for parallel execution. The following screenshot shows the result of analyzing some parts of VirtualBox. To visualize the output of Callgrind (and to interactively work with this data), KCachegrind is the number one tool. The second screenshot shows some similar profiling with Instruments from Xcode.

GUI tests

GUI’s have the advantage to do several tasks in an independent order and users tend to do tasks in a way a developer don’t expect. Developer tends to do tasks in the way they have programmed it. On the other side GUI testing tools do only things they are programmed for. To be honest, we don’t do any automatic GUI testing in VirtualBox. It’s such a wide field and doing it right is hard. Anyway, there are products out there which can be helpful. Qt itself have possibilities for GUI testing build in. Another product is from froglogic. Squish is specialized in GUI testing, especially for Qt applications. But of course there are other tools as well. Just have a look at your preferred build environment.

Conclusion

Testing produces work. It is also something developers don’t like. On the other side it helps to prevent further work by bypassing errors which are preventable. Everybody should ask himself how much time he will sacrifice in setting up test machines or unit tests to make a product much more stable. Errors in freshly released products which don’t happen in an older release are always bad marketing. If there is a chance to prevent them by just adding some lines of code, everyone should use this chance. This post doesn’t show all available tools for testing. For example, the big players like Apple and Microsoft have also testing and analyzing software build into there IDE’s. I just want to give a brief overview what is possible, so that everybody could check the own environment for possibilities of doing testing.

As a last word which touches my personal work environment: Please be assured that we are trying hard to make VirtualBox as stable and save as much as possible ;).

Kernel driver code signing with the VeriSign Class 3 Primary CA – G5 certificate

Since the first 64-bit version of Windows Vista it is necessary to digital sign any kernel mode driver. Without a proper code signing the driver isn’t loaded by the system. Although it is also possible to sign drivers and applications for the 32-bit versions of Windows (as far as I know starting with Windows XP) it became mandatory in the 64-bit versions for any kernel mode driver. A serious software provider always sign its own software to make sure the user can rely on the authenticity of the package he e.g. downloaded from the Internet. It also prevent a question about installing a driver from an untrusted source which could be denied by the user and therefore makes the own software unusable. In any case the user has to confirm an installation of a driver, even if this driver is correctly signed, if the driver isn’t Windows Hardware Quality Labs (WHQL) certificated. In the following post I will not explain the basics of how to sign Windows drivers, there are many articles out there like the one from Microsoft itself, but I will look at changes which have to be made to correctly code sign drivers with a certificate signed by the VeriSign Class 3 Primary CA – G5 root certificate, which is in use by the end of 2010.

Chain of trust

To ensure the validity of every component in a computer system (hardware or software) a chain of trust is build. This basically means there is some root institution (in computer cryptography this is called Certificate Authority (CA)) which is trusted per se. Any following part in this hierarchy is signed by the parent authority. This allows a flexible mechanism where only the connected parties have to make sure they trust each other to make the full chain trustworthy. This concept is also used for code signing, cause it allows to be trustworthy in the eyes of Microsoft without ever being in touch with them. As Microsoft don’t trust (for code signing) every root CA they have in their certificate store, they explicit allow only a handful of root CA’s to be in this trust of chain. They archive this by cross signing root CA’s with their own CA. The full concept is described in this article. It basically means the software maker certificate has to be trusted by an official CA included in every Windows version and this root CA has to be cross signed by Microsoft for code signing. This is the point where the problems start with the new VeriSign Primary CA.

Finding the little differences

The old code signing CA is the VeriSign Class 3 Public Primary CA, available since 1996. This certificate uses an 1024 bit key, which isn’t considered save anymore in the future. Therefor VeriSign decided to replace this root CA with a stronger one, which uses an 2048 bit key. If you simply replace an old software maker certificate (signed with the old root CA) with one which is signed by the new CA you get a surprise. Installing a kernel mode driver signed with the new certificate ends up with a message like this:

A look into the security log of the event viewer shows this error message:

Code integrity determined that the image hash of a file is not valid. The
file could be corrupt due to unauthorized modification or the invalid hash
could indicate a potential disk device error.

To be honest: This information doesn’t contain any useful hint. If you compare the old signed driver with the new signed driver you will not see any difference. Both could be successful verified as shown next:

Even if you compare all the sub-dialogs side by side you will not find any difference, beside the different root CA of course. So whats the difference? Well, you can’t rely on the graphical representation of this trust of chain. When you invoke the signtool of the Windows Driver Kit (WDK) with the verify option, you will see the difference:

C:Program FilesOracleVirtualBox_Sun>signtool.exe verify /v /kp drivers/vboxdrv/VBoxDrv.sys

Verifying: drivers/vboxdrv/VBoxDrv.sys
SHA1 hash of file: 9E58611C764D5AE04140E4CC7782B3229D1BCB8A
Signing Certificate Chain:
    Issued to: Microsoft Code Verification Root
    Issued by: Microsoft Code Verification Root
    Expires:   01.11.2025 14:54:03
    SHA1 hash: 8FBE4D070EF8AB1BCCAF2A9D5CCAE7282A2C66B3

        Issued to: Class 3 Public Primary Certification Authority
        Issued by: Microsoft Code Verification Root
        Expires:   23.05.2016 18:11:29
        SHA1 hash: 58455389CF1D0CD6A08E3CE216F65ADFF7A86408

            Issued to: VeriSign Class 3 Code Signing 2004 CA
            Issued by: Class 3 Public Primary Certification Authority
            Expires:   16.07.2014 00:59:59
            SHA1 hash: 197A4AEBDB25F0170079BB8C73CB2D655E0018A4

                Issued to: Sun Microsystems, Inc.
                Issued by: VeriSign Class 3 Code Signing 2004 CA
                Expires:   12.06.2011 00:59:59
                SHA1 hash: 1D4458051589B47A06260125F6EC6BBB6C24472E

The signature is timestamped: 08.02.2011 00:23:54
Timestamp Verified by:
    Issued to: Thawte Timestamping CA
    Issued by: Thawte Timestamping CA
    Expires:   01.01.2021 00:59:59
    SHA1 hash: BE36A4562FB2EE05DBB3D32323ADF445084ED656

        Issued to: VeriSign Time Stamping Services CA
        Issued by: Thawte Timestamping CA
        Expires:   04.12.2013 00:59:59
        SHA1 hash: F46AC0C6EFBB8C6A14F55F09E2D37DF4C0DE012D

            Issued to: VeriSign Time Stamping Services Signer - G2
            Issued by: VeriSign Time Stamping Services CA
            Expires:   15.06.2012 00:59:59
            SHA1 hash: ADA8AAA643FF7DC38DD40FA4C97AD559FF4846DE

Successfully verified: drivers/vboxdrv/VBoxDrv.sys

Number of files successfully Verified: 1
Number of warnings: 0
Number of errors: 0

C:Program FilesOracleVirtualBox_Sun>

and

C:Program FilesOracleVirtualBox_Oracle_Wrong>signtool.exe verify /v /kp drivers/vboxdrv/VBoxDrv.sys

Verifying: drivers/vboxdrv/VBoxDrv.sys
SHA1 hash of file: F398B7124B0A8C32DBFB262343AC1180807505D0
Signing Certificate Chain:
    Issued to: VeriSign Class 3 Public Primary Certification Authority - G5
    Issued by: VeriSign Class 3 Public Primary Certification Authority - G5
    Expires:   17.07.2036 00:59:59
    SHA1 hash: 4EB6D578499B1CCF5F581EAD56BE3D9B6744A5E5

        Issued to: VeriSign Class 3 Code Signing 2010 CA
        Issued by: VeriSign Class 3 Public Primary Certification Authority - G5
        Expires:   08.02.2020 00:59:59
        SHA1 hash: 495847A93187CFB8C71F840CB7B41497AD95C64F

            Issued to: Oracle Corporation
            Issued by: VeriSign Class 3 Code Signing 2010 CA
            Expires:   08.02.2014 00:59:59
            SHA1 hash: A88FD9BDAA06BC0F3C491BA51E231BE35F8D1AD5

The signature is timestamped: 10.02.2011 09:30:08
Timestamp Verified by:
    Issued to: Thawte Timestamping CA
    Issued by: Thawte Timestamping CA
    Expires:   01.01.2021 00:59:59
    SHA1 hash: BE36A4562FB2EE05DBB3D32323ADF445084ED656

        Issued to: VeriSign Time Stamping Services CA
        Issued by: Thawte Timestamping CA
        Expires:   04.12.2013 00:59:59
        SHA1 hash: F46AC0C6EFBB8C6A14F55F09E2D37DF4C0DE012D

            Issued to: VeriSign Time Stamping Services Signer - G2
            Issued by: VeriSign Time Stamping Services CA
            Expires:   15.06.2012 00:59:59
            SHA1 hash: ADA8AAA643FF7DC38DD40FA4C97AD559FF4846DE

Successfully verified: drivers/vboxdrv/VBoxDrv.sys

Number of files successfully Verified: 1
Number of warnings: 0
Number of errors: 0

C:Program FilesOracleVirtualBox_Oracle_Wrong>

As you can see, the chain of trust of the old certificate contains the Microsoft Code Verification Root, the new signed driver not. As Microsoft released the cross certificate somewhere in 2006, it makes sense that the new VeriSign certificate isn’t signed by them. So first of all, we have to blame the signtool for silently ignoring a cross certificate which, obviously, doesn’t trust the root certificate. When you have this information you can search for additional information and probably find an advisory of VeriSign. There you learn you need intermediate certificates for the new root CA.

Installing the right certificates on the build machine

The rest is easy. The certificate store of any Windows installation contains the new VeriSign Root CA as shown here:

Delete this root CA and replace it by the intermediate certificates you fetched from the website shown above. Just place the certificate in a text file, add the extension .der and double-click to install it. Make sure to replace really all versions of this certificate, even the one in the global store. When you now sign your driver with your new certificate the Microsoft Code Verification Root is in the trust of chain, as shown in the following:

C:Program FilesOracleVirtualBox_Oracle_Correct>signtool.exe verify /v /kp drivers/vboxdrv/VBoxDrv.sys

Verifying: drivers/vboxdrv/VBoxDrv.sys
SHA1 hash of file: 201B7F97473D7F015A104D7841371C5AE4F22FF2
Signing Certificate Chain:
    Issued to: Microsoft Code Verification Root
    Issued by: Microsoft Code Verification Root
    Expires:   01.11.2025 14:54:03
    SHA1 hash: 8FBE4D070EF8AB1BCCAF2A9D5CCAE7282A2C66B3

        Issued to: Class 3 Public Primary Certification Authority
        Issued by: Microsoft Code Verification Root
        Expires:   23.05.2016 18:11:29
        SHA1 hash: 58455389CF1D0CD6A08E3CE216F65ADFF7A86408

            Issued to: VeriSign Class 3 Public Primary Certification Authority - G5
            Issued by: Class 3 Public Primary Certification Authority
            Expires:   08.11.2021 00:59:59
            SHA1 hash: 32F30882622B87CF8856C63DB873DF0853B4DD27

                Issued to: VeriSign Class 3 Code Signing 2010 CA
                Issued by: VeriSign Class 3 Public Primary Certification Authority - G5
                Expires:   08.02.2020 00:59:59
                SHA1 hash: 495847A93187CFB8C71F840CB7B41497AD95C64F

                    Issued to: Oracle Corporation
                    Issued by: VeriSign Class 3 Code Signing 2010 CA
                    Expires:   08.02.2014 00:59:59
                    SHA1 hash: A88FD9BDAA06BC0F3C491BA51E231BE35F8D1AD5

The signature is timestamped: 10.02.2011 15:03:30
Timestamp Verified by:
    Issued to: Thawte Timestamping CA
    Issued by: Thawte Timestamping CA
    Expires:   01.01.2021 00:59:59
    SHA1 hash: BE36A4562FB2EE05DBB3D32323ADF445084ED656

        Issued to: VeriSign Time Stamping Services CA
        Issued by: Thawte Timestamping CA
        Expires:   04.12.2013 00:59:59
        SHA1 hash: F46AC0C6EFBB8C6A14F55F09E2D37DF4C0DE012D

            Issued to: VeriSign Time Stamping Services Signer - G2
            Issued by: VeriSign Time Stamping Services CA
            Expires:   15.06.2012 00:59:59
            SHA1 hash: ADA8AAA643FF7DC38DD40FA4C97AD559FF4846DE

Successfully verified: drivers/vboxdrv/VBoxDrv.sys

Number of files successfully Verified: 1
Number of warnings: 0
Number of errors: 0

C:Program FilesOracleVirtualBox_Oracle_Correct>

You see the old certificate (which is trusted by Microsoft) is the parent of the new certificate, which completes the trust of chain again. I guess this is only some temporary solution as long as Microsoft doesn’t release a new cross certificate (that’s why it is called intermediate). Luckily, you only need the intermediate certificates on the build machine. For your end users nothing has to be changed.

Conclusion

This article shows how a service provider make an easy task hard to do. Signing a kernel mode driver with the new certificate isn’t hard, but finding the right information is. Although there is an advisory from VeriSign, it doesn’t really explain what to do. As I believe in the future many other people will be in the same situation, I hope this article will save them from some sleepless nights.