Tag Archives: Windows

TT: Uni-directional file synchronization between different hosts with Unison

When you work with at least two computers on the same project on a daily basis you might have a problem. You need to get changed files from host A to host B and vice versa. The problem getting bigger when you work in addition on different operation systems or use more than two hosts. On UNIX/Linux the preferred tool for such a task is Rsync. Unfortunately Rsync synchronize only in one direction, it doesn’t work very well when more than two hosts are involved (and it isn’t really comfortable to set up on Windows) and can’t use a secure communication channel. Another approach is to check-in changed source files into a version control system, like CVS. On host A you check it in and on host B you check it out afterwards. But this means you always need a more or less stable variant of your code, so that other developer can, at least compile, or much better use it. That is not always the case (especially when you leave the office at 11:00 p.m.) and it also doesn’t cover files which aren’t handled by a version control system. Luckily there is a solution for all the problems mentioned which is called Unison. So here comes the second post in the ToolTips series, which covers an easy and portable way for file synchronization.

Installing Unison

Most modern Linux distributions include Unison in their package manage system. On Mac OS X you can use MacPorts. Alternatively you could download a binary version for Mac OS X or Windows here. To prevent surprises and unnecessary trouble it might be a good idea to make sure that every involved system use the same version of Unison. At least on Linux and Mac OS X it is relatively easy to compile Unison from the sources.

Setting up public/private key authentication for ssh

One advantage of Unison over Rsync is that you can use different communication channels for the file transfers. One is ssh. As I always prefer/demand encrypted communication this is a big plus of course. In the default setup you can just use ssh. But for a little bit more comfort I suggest to create a public/private key pair for the authentication.
The following creates public/private keys without a password. Although this is much more easier to use, it should be only used on hosts which are trusted. If you are in doubt, use the normal password approach or even better create a public/private key pair with a password. Create a new public/private key pair with the following command:

user@host-a ~ $ ssh-keygen -t rsa

When you are asked for a password just hit Enter twice. The command creates the private key in ~/.ssh/id_rsa and the public key in ~/.ssh/id_rsa.pub. Now copy the public key to host B:

user@host-a ~ $ scp ~/.ssh/id_rsa.pub host_B:.ssh/authorized_keys

If you already have some public keys on host B, make sure you append the new key and not overwrite the file by the above command. Make the file accessible by the user only with:

user@host-b ~ $ chmod 600 ~/.ssh/authorized_keys

Now you should be able to connect to host B without any interaction needed.

Configuring Unison

Like in the long UNIX tradition, Unison is configured using text files. The files are located in the ~/.unison directory. You can configure more than one synchronization target by choosing a meaningful name. There exists one default target which is configured in the file default.prf. Because I have more than one target I prefer to split the configuration into several files. You can include other project files with the include statement as shown here:

# directory on host a (this is where Unison will be executed)
root       = /mnt/data/projects
# directory on host b (this is the remote host)
root       = ssh://host-b//mnt/data/projects
# which directories to sync?
include projects_files.prf
# options
include options.prf
ignorecase = false
# unison executable on the server
servercmd  = /usr/local/bin/unison

We setup the root directories on both machines, including the configuration file for the project target and some generic option file. We also overwriting the default unison location, because this is a self compiled version. The file options.prf looks like this:

# No staled nfs and mac store files
ignore  = Name .nfs*
ignore  = Name .DS_Store
# options
log     = true
rsrc    = true
auto    = true
#debug   = verbose
#logfile = ~/.unison/unison.log

This just set some generic options which are valid for all my targets. For the specific target projects the file projects_files.prf contains mainly the directories and files which should be ignored:

# No ISOs
ignore    = Path vms/ISO
# Ignore VBox branches
ignore    = Path vbox-*
# No binary output from the other platforms
ignore    = Path vbox*/out/*
# One exception:
ignorenot = Path vbox/out/linux.amd64.additions
# No wine stuff
ignore    = Path vbox*/wine.*
# Tools
ignore    = Name vbox*/tools/{FetchDir,freebsd*,os2*}

So in general, you configure the directory to synchronize and later define directories or files which should be ignored. As you see, you can include or exclude paths as you like. Even simple bash wildcards are possible. As shown in this example I exclude all binary files of a VirtualBox build, because they are useless on another platform. Understanding how Unison decide which directories or files should be synchronized is sometimes difficult. So I suggest to carefully read the documentation and just use the “try and failure” approach ;). Another reason for splitting up the configuration files is you can synchronize these files as well. I have another target which synchronize several configuration files, e.g. .bashrc, .profile, .vim* and the sub-project files of Unison like the projects_files.prf. You can’t synchronize e.g. default.prf, cause the root directories are different from host to host, but the general configuration is always the same. My home target looks like this:

# Which directories/files to sync?
path = .bashrc
path = .ion3
path = .gdbinit
path = .cgdb
path = .valgrind-vbox.supp
path = .vim
path = .vimrc
path = .gvimrc
path = .Xdefaults
path = .gnupg
path = .unison/options.prf
path = .unison/home_files.prf
path = .unison/projects_files.prf
# Do not sync:
ignore = Path .vim/.netrwhist
ignore = Path .ion3/default-session*
ignore = Path .cgdb/readline_history.txt

One of the strengths over other synchronization tools is, you can do this for others host as well. So if you synchronize between host a and host b you can also synchronize between host c and host b. However, a little bit of discipline is necessary. There should be one host which all other host synchronize again.
If you now execute unison the project target will be used. If you execute unison home the files of the home target will be synchronized.

Conclusion

Unison is a very powerful tool. You can synchronize between more than two hosts (OS independent), in a secure way and uni-directional. Currently there is no better tool and I use it on a daily basis.
Kernel driver code signing with the VeriSign Class 3 Primary CA – G5 certificate

Since the first 64-bit version of Windows Vista it is necessary to digital sign any kernel mode driver. Without a proper code signing the driver isn’t loaded by the system. Although it is also possible to sign drivers and applications for the 32-bit versions of Windows (as far as I know starting with Windows XP) it became mandatory in the 64-bit versions for any kernel mode driver. A serious software provider always sign its own software to make sure the user can rely on the authenticity of the package he e.g. downloaded from the Internet. It also prevent a question about installing a driver from an untrusted source which could be denied by the user and therefore makes the own software unusable. In any case the user has to confirm an installation of a driver, even if this driver is correctly signed, if the driver isn’t Windows Hardware Quality Labs (WHQL) certificated. In the following post I will not explain the basics of how to sign Windows drivers, there are many articles out there like the one from Microsoft itself, but I will look at changes which have to be made to correctly code sign drivers with a certificate signed by the VeriSign Class 3 Primary CA – G5 root certificate, which is in use by the end of 2010.

Chain of trust

To ensure the validity of every component in a computer system (hardware or software) a chain of trust is build. This basically means there is some root institution (in computer cryptography this is called Certificate Authority (CA)) which is trusted per se. Any following part in this hierarchy is signed by the parent authority. This allows a flexible mechanism where only the connected parties have to make sure they trust each other to make the full chain trustworthy. This concept is also used for code signing, cause it allows to be trustworthy in the eyes of Microsoft without ever being in touch with them. As Microsoft don’t trust (for code signing) every root CA they have in their certificate store, they explicit allow only a handful of root CA’s to be in this trust of chain. They archive this by cross signing root CA’s with their own CA. The full concept is described in this article. It basically means the software maker certificate has to be trusted by an official CA included in every Windows version and this root CA has to be cross signed by Microsoft for code signing. This is the point where the problems start with the new VeriSign Primary CA.

Finding the little differences

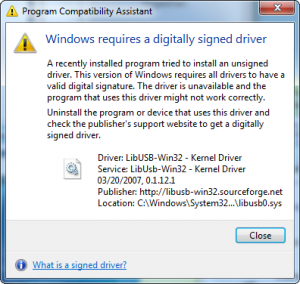
The old code signing CA is the VeriSign Class 3 Public Primary CA, available since 1996. This certificate uses an 1024 bit key, which isn’t considered save anymore in the future. Therefor VeriSign decided to replace this root CA with a stronger one, which uses an 2048 bit key. If you simply replace an old software maker certificate (signed with the old root CA) with one which is signed by the new CA you get a surprise. Installing a kernel mode driver signed with the new certificate ends up with a message like this:

A look into the security log of the event viewer shows this error message:

Code integrity determined that the image hash of a file is not valid. The
file could be corrupt due to unauthorized modification or the invalid hash
could indicate a potential disk device error.

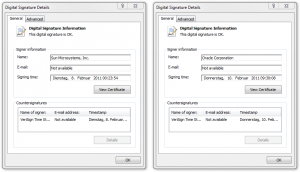
To be honest: This information doesn’t contain any useful hint. If you compare the old signed driver with the new signed driver you will not see any difference. Both could be successful verified as shown next:

Even if you compare all the sub-dialogs side by side you will not find any difference, beside the different root CA of course. So whats the difference? Well, you can’t rely on the graphical representation of this trust of chain. When you invoke the signtool of the Windows Driver Kit (WDK) with the verify option, you will see the difference:

C:Program FilesOracleVirtualBox_Sun>signtool.exe verify /v /kp drivers/vboxdrv/VBoxDrv.sys

Verifying: drivers/vboxdrv/VBoxDrv.sys
SHA1 hash of file: 9E58611C764D5AE04140E4CC7782B3229D1BCB8A
Signing Certificate Chain:
    Issued to: Microsoft Code Verification Root
    Issued by: Microsoft Code Verification Root
    Expires:   01.11.2025 14:54:03
    SHA1 hash: 8FBE4D070EF8AB1BCCAF2A9D5CCAE7282A2C66B3

        Issued to: Class 3 Public Primary Certification Authority
        Issued by: Microsoft Code Verification Root
        Expires:   23.05.2016 18:11:29
        SHA1 hash: 58455389CF1D0CD6A08E3CE216F65ADFF7A86408

            Issued to: VeriSign Class 3 Code Signing 2004 CA
            Issued by: Class 3 Public Primary Certification Authority
            Expires:   16.07.2014 00:59:59
            SHA1 hash: 197A4AEBDB25F0170079BB8C73CB2D655E0018A4

                Issued to: Sun Microsystems, Inc.
                Issued by: VeriSign Class 3 Code Signing 2004 CA
                Expires:   12.06.2011 00:59:59
                SHA1 hash: 1D4458051589B47A06260125F6EC6BBB6C24472E

The signature is timestamped: 08.02.2011 00:23:54
Timestamp Verified by:
    Issued to: Thawte Timestamping CA
    Issued by: Thawte Timestamping CA
    Expires:   01.01.2021 00:59:59
    SHA1 hash: BE36A4562FB2EE05DBB3D32323ADF445084ED656

        Issued to: VeriSign Time Stamping Services CA
        Issued by: Thawte Timestamping CA
        Expires:   04.12.2013 00:59:59
        SHA1 hash: F46AC0C6EFBB8C6A14F55F09E2D37DF4C0DE012D

            Issued to: VeriSign Time Stamping Services Signer - G2
            Issued by: VeriSign Time Stamping Services CA
            Expires:   15.06.2012 00:59:59
            SHA1 hash: ADA8AAA643FF7DC38DD40FA4C97AD559FF4846DE

Successfully verified: drivers/vboxdrv/VBoxDrv.sys

Number of files successfully Verified: 1
Number of warnings: 0
Number of errors: 0

C:Program FilesOracleVirtualBox_Sun>

and

C:Program FilesOracleVirtualBox_Oracle_Wrong>signtool.exe verify /v /kp drivers/vboxdrv/VBoxDrv.sys

Verifying: drivers/vboxdrv/VBoxDrv.sys
SHA1 hash of file: F398B7124B0A8C32DBFB262343AC1180807505D0
Signing Certificate Chain:
    Issued to: VeriSign Class 3 Public Primary Certification Authority - G5
    Issued by: VeriSign Class 3 Public Primary Certification Authority - G5
    Expires:   17.07.2036 00:59:59
    SHA1 hash: 4EB6D578499B1CCF5F581EAD56BE3D9B6744A5E5

        Issued to: VeriSign Class 3 Code Signing 2010 CA
        Issued by: VeriSign Class 3 Public Primary Certification Authority - G5
        Expires:   08.02.2020 00:59:59
        SHA1 hash: 495847A93187CFB8C71F840CB7B41497AD95C64F

            Issued to: Oracle Corporation
            Issued by: VeriSign Class 3 Code Signing 2010 CA
            Expires:   08.02.2014 00:59:59
            SHA1 hash: A88FD9BDAA06BC0F3C491BA51E231BE35F8D1AD5

The signature is timestamped: 10.02.2011 09:30:08
Timestamp Verified by:
    Issued to: Thawte Timestamping CA
    Issued by: Thawte Timestamping CA
    Expires:   01.01.2021 00:59:59
    SHA1 hash: BE36A4562FB2EE05DBB3D32323ADF445084ED656

        Issued to: VeriSign Time Stamping Services CA
        Issued by: Thawte Timestamping CA
        Expires:   04.12.2013 00:59:59
        SHA1 hash: F46AC0C6EFBB8C6A14F55F09E2D37DF4C0DE012D

            Issued to: VeriSign Time Stamping Services Signer - G2
            Issued by: VeriSign Time Stamping Services CA
            Expires:   15.06.2012 00:59:59
            SHA1 hash: ADA8AAA643FF7DC38DD40FA4C97AD559FF4846DE

Successfully verified: drivers/vboxdrv/VBoxDrv.sys

Number of files successfully Verified: 1
Number of warnings: 0
Number of errors: 0

C:Program FilesOracleVirtualBox_Oracle_Wrong>

As you can see, the chain of trust of the old certificate contains the Microsoft Code Verification Root, the new signed driver not. As Microsoft released the cross certificate somewhere in 2006, it makes sense that the new VeriSign certificate isn’t signed by them. So first of all, we have to blame the signtool for silently ignoring a cross certificate which, obviously, doesn’t trust the root certificate. When you have this information you can search for additional information and probably find an advisory of VeriSign. There you learn you need intermediate certificates for the new root CA.

Installing the right certificates on the build machine

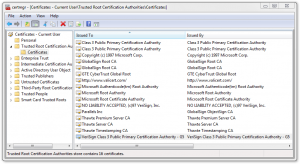
The rest is easy. The certificate store of any Windows installation contains the new VeriSign Root CA as shown here:

Delete this root CA and replace it by the intermediate certificates you fetched from the website shown above. Just place the certificate in a text file, add the extension .der and double-click to install it. Make sure to replace really all versions of this certificate, even the one in the global store. When you now sign your driver with your new certificate the Microsoft Code Verification Root is in the trust of chain, as shown in the following:

C:Program FilesOracleVirtualBox_Oracle_Correct>signtool.exe verify /v /kp drivers/vboxdrv/VBoxDrv.sys

Verifying: drivers/vboxdrv/VBoxDrv.sys
SHA1 hash of file: 201B7F97473D7F015A104D7841371C5AE4F22FF2
Signing Certificate Chain:
    Issued to: Microsoft Code Verification Root
    Issued by: Microsoft Code Verification Root
    Expires:   01.11.2025 14:54:03
    SHA1 hash: 8FBE4D070EF8AB1BCCAF2A9D5CCAE7282A2C66B3

        Issued to: Class 3 Public Primary Certification Authority
        Issued by: Microsoft Code Verification Root
        Expires:   23.05.2016 18:11:29
        SHA1 hash: 58455389CF1D0CD6A08E3CE216F65ADFF7A86408

            Issued to: VeriSign Class 3 Public Primary Certification Authority - G5
            Issued by: Class 3 Public Primary Certification Authority
            Expires:   08.11.2021 00:59:59
            SHA1 hash: 32F30882622B87CF8856C63DB873DF0853B4DD27

                Issued to: VeriSign Class 3 Code Signing 2010 CA
                Issued by: VeriSign Class 3 Public Primary Certification Authority - G5
                Expires:   08.02.2020 00:59:59
                SHA1 hash: 495847A93187CFB8C71F840CB7B41497AD95C64F

                    Issued to: Oracle Corporation
                    Issued by: VeriSign Class 3 Code Signing 2010 CA
                    Expires:   08.02.2014 00:59:59
                    SHA1 hash: A88FD9BDAA06BC0F3C491BA51E231BE35F8D1AD5

The signature is timestamped: 10.02.2011 15:03:30
Timestamp Verified by:
    Issued to: Thawte Timestamping CA
    Issued by: Thawte Timestamping CA
    Expires:   01.01.2021 00:59:59
    SHA1 hash: BE36A4562FB2EE05DBB3D32323ADF445084ED656

        Issued to: VeriSign Time Stamping Services CA
        Issued by: Thawte Timestamping CA
        Expires:   04.12.2013 00:59:59
        SHA1 hash: F46AC0C6EFBB8C6A14F55F09E2D37DF4C0DE012D

            Issued to: VeriSign Time Stamping Services Signer - G2
            Issued by: VeriSign Time Stamping Services CA
            Expires:   15.06.2012 00:59:59
            SHA1 hash: ADA8AAA643FF7DC38DD40FA4C97AD559FF4846DE

Successfully verified: drivers/vboxdrv/VBoxDrv.sys

Number of files successfully Verified: 1
Number of warnings: 0
Number of errors: 0

C:Program FilesOracleVirtualBox_Oracle_Correct>

You see the old certificate (which is trusted by Microsoft) is the parent of the new certificate, which completes the trust of chain again. I guess this is only some temporary solution as long as Microsoft doesn’t release a new cross certificate (that’s why it is called intermediate). Luckily, you only need the intermediate certificates on the build machine. For your end users nothing has to be changed.

Conclusion

This article shows how a service provider make an easy task hard to do. Signing a kernel mode driver with the new certificate isn’t hard, but finding the right information is. Although there is an advisory from VeriSign, it doesn’t really explain what to do. As I believe in the future many other people will be in the same situation, I hope this article will save them from some sleepless nights.

Creating file shortcuts on three different operation systems

As you may know, developing for multiple platforms is one of my strengths. Strictly speaking, it’s a basic requirement if you are involved in such a product like VirtualBox, which runs on every major (and several minor) platform available today. Beside the GUI, which uses Qt and therewith is portable without any additional cost (which isn’t fully true if you want real native look and feel on every platform, especially on Mac OS X), all the rest of VirtualBox is written in a portable way. This is done by using only C/C++ and Assembler when necessary. Everything which needs a different approach, because of the design of the OS (and the API’s which are available there), is implemented in a platform dependent way. In the history of VirtualBox, several modules are created and grown by the time, which makes it really easy to deal with this differences. For stuff like file handling, paths, strings, semaphores or any other basic functionality, you can just use the modules which are available. On the other side it might be necessary, for a new feature we implement, to write it from the ground. In the following post I will show how to create a file shortcut for the three major operation systems available today.

Why do you want to use file shortcuts

On the classical UNIX systems you have hard and soft links. These are implemented by the filesystem and make it possible to link to another file or folder without any trouble. Most of the time soft links are used, but it really depends on the use case. Unfortunately these kind of links are not available on Windows (yes, I know there are also hard links and junctions on NTFS, but they are not common and difficult to handle), these links doesn’t allow any additional attributes. For example one like to add a different icon to the link or provide more information through a comment field. Beside on Mac OS X, shortcuts can also be work as an application launcher, where the link contain the information what application should be started and how. In contrast to filesystem links which are handled by the operation system, these shortcuts are handled by the window system (or shell) running on the host (which doesn’t mean there is no filesystem support for it). On Windows this is the Explorer, on Mac OS X the Finder and on Linux a freedesktop.org conforming file manager.

Creating a Desktop file on Linux

Desktop files on Linux (or any other UNIX system which conforms to freedesktop.org) is easy. It’s a simple text file which implement the Desktop Entry Specification. In version 1.0 there are 18 possible entries, where not all of them are mandatory. In the following example I use Qt to write these files, but it should be no problem to use any other toolkit or plain C.

bool createShortcut(const QString &strSrcFile,
                    const QString &strDstPath,
                    const QString &strName)
{
 QFile link(strDstPath + QDir::separator() + strName + ".desktop");
 if (link.open(QFile::WriteOnly | QFile::Truncate))
 {
  QTextStream out(&link);
  out.setCodec("UTF-8");
  out << "[Desktop Entry]" << endl
      << "Encoding=UTF-8" << endl
      << "Version=1.0" << endl
      << "Type=Link" << endl
      << "Name=" << strName << endl
      << "URL=" << strSrcFile << endl
      << "Icon=icon-name" << endl;
  return true;
 }
 return false;
}

Replace icon-name by a registered icon on the system and you are done.

Creating a Shell link on Windows

Windows provides an interface for IShellLink since Windows XP. The following example shows how to use it:

bool createShortcut(LPCSTR lpszSrcFile,
                    LPCSTR lpszDstPath,
                    LPCSTR lpszName)
{
 IShellLink *pShl = NULL;
 IPersistFile *pPPF = NULL;
 HRESULT rc = CoCreateInstance(CLSID_ShellLink,
                               NULL,
                               CLSCTX_INPROC_SERVER,
                               IID_IShellLink,
                               (void**)(&pShl));
 if (FAILED(rc))
  return false;
 do
 {
  rc = pShl->SetPath(lpszSrcFile);
  if (FAILED(rc))
   break;
  rc = pShl->QueryInterface(IID_IPersistFile, (void**)&pPPF);
  if (FAILED(rc))
   break;
  WORD wsz[MAX_PATH];
  TCHAR path[MAX_PATH] = { 0 };
  lstrcat(path, lpszDstPath);
  lstrcat(path, "\");
  lstrcat(path, lpszName);
  lstrcat(path, ".lnk");
  MultiByteToWideChar(CP_ACP, 0, buf, -1, wsz, MAX_PATH);
  rc = pPPF->Save(wsz, TRUE);
 } while(0);
 if (pPPF)
  pPPF->Release();
 if (pShl)
  pShl->Release();
 return SUCCEEDED(rc);
}

As you may noticed this uses COM. Many API’s on Windows using the COM interface to communicate between processes. If you don’t use COM in your application you have to initialize it first. This is achieved by adding the following call to the front of the function:

 if (FAILED(CoInitialize(NULL))
  return false;

Depending on your application it might be worth to unitialize COM after usage by appending the following to the function:

 CoUninitialize();

The function itself isn’t any magic. It gets a COM interface to the IShellLink interface and then work with it, by setting the source path and adding a target path by using the IPersistFile interface. As I wrote before you could do much more. Providing a path to a specific application or adding your own parameters is no problem. Have a look at the documentation.

Creating an Alias file on Mac OS X

Shortcut files on Mac OS X are a little bit different. At first, they aren’t one. There are the classical filesystem links and Alias files. Alias files are links which targeting a specific file, but they haven’t all the possibilities of shortcuts like on Windows or Linux. As the name suggest they are really only an alias for another file or directory. So specifying an application to start or things like that aren’t possible. Anyway they allow changing the icon and they are more persistent than on Window or Linux cause they are working with several attributes of the target file. Even if you rename or move the target, an Alias file will resolve the target correctly (if it is possible). On the other side, being such special means also being hard to create. In principle there are two possibilities. The first one is, creating a file which is no file at all, but has several resources forks attached. Therefor you need to know exactly how Alias files are built of and make sure with every release of Mac OS X you are following the development. There is a free project which does exactly that: NDAlias. If you are like me and a little bit more lazy, you ask someone who should know how to create Alias files. This is Finder. Although writing the files itself isn’t easy, asking the Finder to do the job is not really easier, cause the information about doing exactly that are really rare. The following code shows how to achieve it:

bool createShortcut(NSString *pstrSrcFile,
                    NSString *pstrDstPath,
                    NSString *pstrName)
{
 /* First of all we need to figure out which process Id the Finder
  * currently has. */
 NSWorkspace *pWS = [NSWorkspace sharedWorkspace];
 NSArray *pApps = [pWS launchedApplications];
 bool fFFound = false;
 ProcessSerialNumber psn;
 for (NSDictionary *pDict in pApps)
 {
  if ([[pDict valueForKey:@"NSApplicationBundleIdentifier"]
         isEqualToString:@"com.apple.finder"])
  {
   psn.highLongOfPSN = [[pDict
                          valueForKey:@"NSApplicationProcessSerialNumberHigh"] intValue];
   psn.lowLongOfPSN  = [[pDict
                          valueForKey:@"NSApplicationProcessSerialNumberLow"] intValue];
   fFFound = true;
   break;
  }
 }
 if (!fFFound)
  return false;
 /* Now the event fun begins. */
 OSErr err = noErr;
 AliasHandle hSrcAlias = 0;
 AliasHandle hDstAlias = 0;
 do
 {
  /* Create a descriptor which contains the target psn. */
  NSAppleEventDescriptor *finderPSNDesc = [NSAppleEventDescriptor
                                            descriptorWithDescriptorType:typeProcessSerialNumber
                                            bytes:&psn
                                            length:sizeof(psn)];
  if (!finderPSNDesc)
   break;
  /* Create the Apple event descriptor which points to the Finder
   * target already. */
  NSAppleEventDescriptor *finderEventDesc = [NSAppleEventDescriptor
                                              appleEventWithEventClass:kAECoreSuite
                                              eventID:kAECreateElement
                                              argetDescriptor:finderPSNDesc
                                              returnID:kAutoGenerateReturnID
                                              transactionID:kAnyTransactionID];
  if (!finderEventDesc)
   break;
  /* Create and add an event type descriptor: Alias */
  NSAppleEventDescriptor *osTypeDesc = [NSAppleEventDescriptor descriptorWithTypeCode:typeAlias];
  if (!osTypeDesc)
   break;
  [finderEventDesc setParamDescriptor:osTypeDesc forKeyword:keyAEObjectClass];
  /* Now create the source Alias, which will be attached to the event. */
  err = FSNewAliasFromPath(nil, [pstrSrcFile fileSystemRepresentation], 0, &hSrcAlias, 0);
  if (err != noErr)
   break;
  char handleState;
  handleState = HGetState((Handle)hSrcAlias);
  HLock((Handle)hSrcAlias);
  NSAppleEventDescriptor *srcAliasDesc = [NSAppleEventDescriptor
                                           descriptorWithDescriptorType:typeAlias
                                           bytes:*hSrcAlias
                                           length:GetAliasSize(hSrcAlias)];
  if (!srcAliasDesc)
   break;
  [finderEventDesc setParamDescriptor:srcAliasDesc
    forKeyword:keyASPrepositionTo];
  HSetState((Handle)hSrcAlias, handleState);
  /* Next create the target Alias and attach it to the event. */
  err = FSNewAliasFromPath(nil, [pstrDstPath fileSystemRepresentation], 0, &hDstAlias, 0);
  if (err != noErr)
   break;
  handleState = HGetState((Handle)hDstAlias);
  HLock((Handle)hDstAlias);
  NSAppleEventDescriptor *dstAliasDesc = [NSAppleEventDescriptor
                                           descriptorWithDescriptorType:t ypeAlias
                                           bytes:*hDstAlias
                                           length:GetAliasSize(hDstAlias)];
  if (!dstAliasDesc)
   break;
  [finderEventDesc setParamDescriptor:dstAliasDesc
    forKeyword:keyAEInsertHere];
  HSetState((Handle)hDstAlias, handleState);
  /* Finally a property descriptor containing the target
   * Alias name. */
  NSAppleEventDescriptor *finderPropDesc = [NSAppleEventDescriptor recordDescriptor];
  if (!finderPropDesc)
   break;
  [finderPropDesc setDescriptor:[NSAppleEventDescriptor descriptorWithString:pstrName]
    forKeyword:keyAEName];
  [finderEventDesc setParamDescriptor:finderPropDesc forKeyword:keyAEPropData];
  /* Now send the event to the Finder. */
  err = AESend([finderEventDesc aeDesc],
               NULL,
               kAENoReply,
               kAENormalPriority,
               kNoTimeOut,
               0,
               nil);
 } while(0);
 /* Cleanup */
 if (hSrcAlias)
  DisposeHandle((Handle)hSrcAlias);
 if (hDstAlias)
  DisposeHandle((Handle)hDstAlias);
 return err == noErr ? true : false;
}

Although the code above looks a little bit scary, it does not much. It fetch the process serial number of the current Finder process, creates an Application event for creating an Alias file and send this event to the Finder.

Conclusion

Beside showing how to create file shortcuts on different platforms, this article also shows which work is necessary to create platform independent code. It’s a simple example. But it also makes clear that one simple solution for platform one, not necessarily mean it’s such simple on platform two.

Making this easy accessible to any developer is the next step. I will leave this exercise to the reader, but have a look at the platform code of the VirtualBox GUI and the corresponding Makefile.