In the first part of this series I looked into how to assemble a two-way mirror so that an Android phone behind it can be used as an information hub. Of course this is only one part of the story, cause we also need some software to display all this useful information on our Android device. Now, obviously there is already such software available, however I decided to write my own version from scratch for the following reasons:
- to learn more about Android application development
- it had to support Android Gingerbread (API level 10)
- have all the modules important to me here in the UK
- I like coding …
I will not fully describe all the code in this post, you can find the complete git repository here, but instead only pick the parts I think need some more detailed explanation. So lets start …
All about modules
I chose the common software pattern of separating the final presentation of the data from the task of gathering it. All the data generation is done in modules which are independent of the UI. Most of those modules are using a remote web service for the information retrieval and therefore need to run asynchronous to the application main thread. By using OkHttp asynchronously for the remote access this is basically provided for free. A module is based on the abstract class Module which acts as connection to the UI. Every module will call postData when new data is available and postNoData when there is no data available or the module wants to clear any previous data it had sent. Obviously there are also some simple modules like the ClockModule which don’t use any web service, but also don’t need the complex asynchronies behaviour cause they executing rather quickly. Each module defines it own update rate cause this really depends on the nature of the data itself. Train time updates are rather frequent in contrast to the sunrise/sunset times which only change twice a day. Speaking about those two modules, let’s have a look which modules are available at the time of this writing:
- Time/Date:
ClockModule - Sunrise/Sunset:
SunTimesModule - Weather information from the UK Met Office:
ForecastMetOfficeModule - Travel time to work by car:
TimeToWorkModule - Next tube trains from a specific station:
TflModule - Next national rail trains from a specific station:
NationalRailModule - Upcoming calendar events for the next few days (API level >= 23):
CalendarModule
Actually there is an eighth module called the TrainJourneyModule. This is a meta module combining the output of the tube and national rail train times modules into one. It sorts them by departure time so both types are shown interleaved.
For the data query part, Met Office, Tfl and Google Maps are using JSON. This is pretty standard nowadays and Java on Android has built-in support for parsing it. I was looking into more advanced JSON parsing libraries like gson and jackson but decided for the really simple task of parsing one static response it is not worth it to pull in those big dependencies. Maybe I will change that it the future, but for now the present code works just fine.
Looking at JSON data in Firefox is much more comfortable by using a JSON document viewer add-on like JSONView.A completely different beast is the data query task for the National Rail module. National Rail uses the SOAP protocol and compared to JSON the authentication is already complicated. All web services use some type of API access token which is unique to every developer. This exists to prevent misuse of the public API, but in some cases also to limit the number of times an API can be accessed per day. To successfully prove to the National Rail web service that we are who we are we need to add an authentication token to the SOAP envelope header:
Namespace soap = Namespace.getNamespace("soap", "http://schemas.xmlsoap.org/soap/envelope/");
Namespace ldb = Namespace.getNamespace("ldb", "http://thalesgroup.com/RTTI/2014-02-20/ldb/");
Namespace typ = Namespace.getNamespace("typ", "http://thalesgroup.com/RTTI/2010-11-01/ldb/commontypes");
Element env = new Element("Envelope", soap);
/* Header */
env.addContent(new Element("Header", soap).
        addContent(new Element("AccessToken", typ).
            addContent(new Element("TokenValue", typ).
                addContent(BuildConfig.NATIONALRAIL_API_KEY))));
BuildConfig.NATIONALRAIL_API_KEY contains the API key. The rest of the body contains the actual request:
Element dep_request = new Element("GetDepartureBoardRequest", ldb).
    addContent(new Element("crs", ldb).
            addContent(BuildConfig.NATIONALRAIL_CRS)).
    addContent(new Element("numRows", ldb).
            addContent("5"));
...
Now, you may think this is simple enough, but I can assure you I needed quite some time to figure this out, cause the server on the other side is pretty strict on how this structure should look like. And as you can see SOAP uses XML which makes the request creation and the response parsing even harder. Luckily jdom2 exists which greatly simplifies this task. Here you can see the complete xml request:
<?xml version="1.0" encoding="UTF-8"?>
<soap:Envelope xmlns:soap="http://schemas.xmlsoap.org/soap/envelope/">
  <soap:Header>
   <typ:AccessToken xmlns:typ="http://thalesgroup.com/RTTI/2010-11-01/ldb/commontypes">
     <typ:TokenValue>6ef19def-6037-44f4-a2ac-06449273214f</typ:TokenValue>
   </typ:AccessToken>
  </soap:Header>
  <soap:Body>
    <ldb:GetDepartureBoardRequest xmlns:ldb="http://thalesgroup.com/RTTI/2014-02-20/ldb/">
      <ldb:crs>CHX</ldb:crs>
      <ldb:numRows>5</ldb:numRows>
    </ldb:GetDepartureBoardRequest>
  </soap:Body>
</soap:Envelope>
For more information on the various formats used by the different providers, have a look to their developer portals:
User interface
The user interface is quite simplistic. There is no way to interact with the application because it is behind a mirror. The only function the application has is to display the output of our modules in a nice and readable way. All the text and icons are white on black background. This ensures for best contrast behind the two-way mirror and makes it possible to see the information even on normal daylight. I tried to make all state changes animated, see for example AnimationSwitcher for the details. One interesting challenge is the code for switching to fullscreen for the different supported API levels. A nice feature of Android is that you can use new functionality of newer Android versions in your application and check at runtime if this new functionality is available. In your build.gradle you define the minimum supported Android version (minSdkVersion) and also the version your application is written against (targetSdkVersion). At runtime you check Build.VERSION.SDK_INT against the Android version when a specific feature was introduced. Only if this is equal or greater you can use this code. Now if you are below the required Android version you either need to fallback to other code providing similar functionality or your application can’t provide support for this particular feature (see e.g. CalendarView). Main.java contains four different functions for switching into fullscreen. In API level 13 and below the only way to do this was to set the FLAG_FULLSCREEN for the main window. Starting with API level 14, setSystemUiVisibility was introduced which allows a more fine grade configuration of the behaviour of the Android system when your application is in the foreground. Over the following Android versions more and more flags have been introduced.
Configuration
MirrorHub doesn’t come with any runtime configuration. Remember the user is not able to make any changes when the phone/tablet is attached to the mirror. All the configuration is done at compile time by setting the various options in the gradle.properties file. You can use gradle.properties.example as the start for your own experiments. It contains things like the location for the weather forecast or the tube/train station you like to have departure information displayed on your mirror. But most importantly it contains the API keys for the various web services in use as outlined here.
runDebug/runRelease task to gradle which allows you to start the application without any physical interaction with the device. Together with an app like WiFi ADB you can install and run the application remotely while the device is attached to the mirror. However, please note that WiFi ADB needs a rooted device.
Final thoughts
I think the app has a lot of nice feature already. It runs on my mirror 24/7 and works just fine. I still have some more ideas for modules, like a caldav module to display calendar events from a caldav server, because the Android version that I use has no direct calendar support. I also played around with the proximity sensor to detect some hand waving in front of the mirror. It works fine with just the device, but unfortunately not when the phone is behind the mirror. The code is still there, so if you have some ideas how to make something like this work let me know in the comments.
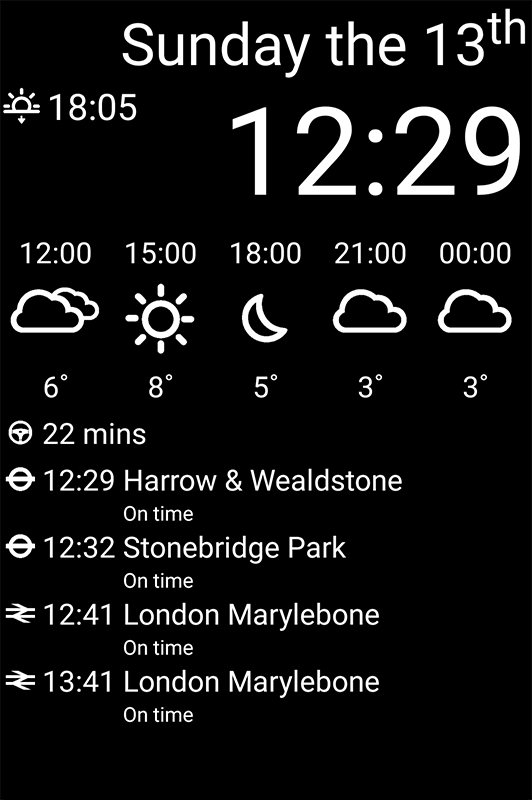
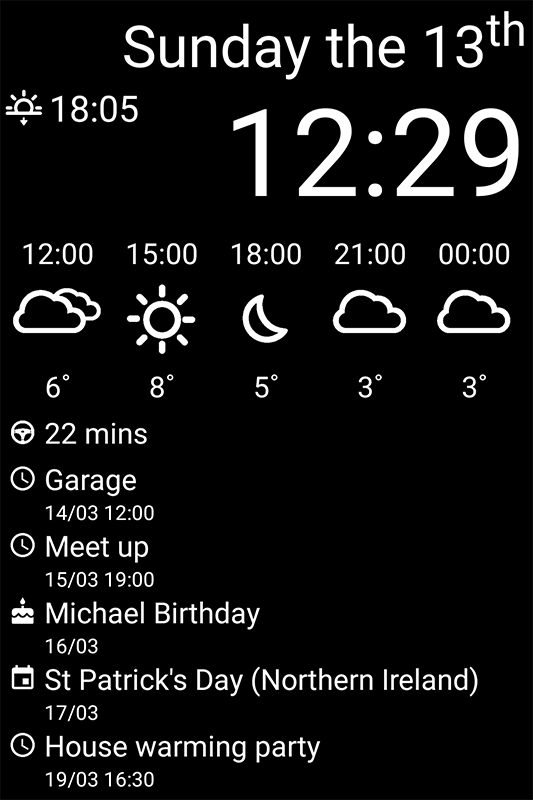
Finally here are some screenshots while MirrorHub is running:
For some images together with the mirror see the end of the first post.